I just submitted my PhD thesis so I got some spare time1. I decided to jump on the current AI bandwagon: Stable Diffusion. Very recently I received access to OpenAI DALL-E, but DALL-E runs on the cloud, not locally2. Stable Diffusion can run locally, but with a substantial requirement: modern GPU. I have a ROG Zephyrus 20203 laptop, which I think would be good enough for this small experiment.
Running Stable Diffusion requires the following:
- A
condaenvironment. I went withminiconda. - Checkpoint file. I am unsure what “checkpoint” here means, I assume it is the model that is required by Stable Diffusion. At the time of writing, I downloaded
sd-v1-4.ckpt. Registration on Hugging Face website is required to download it.
Directory Structure and Dependencies
I downloaded CompVis/stable-diffusion git repo as zip archive and extracted its content.
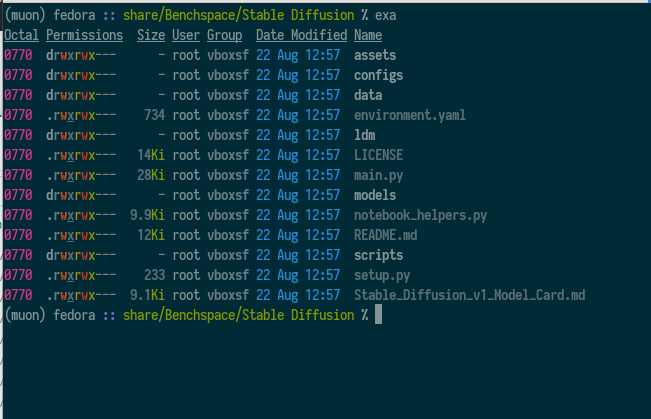
With the application extracted, I created stable-diffusion-v1 folder within models/ldm/ and downloaded the sd-v1-4.ckpt as model.ckpt into this newly-created directory.
This is a 4GB download, jsyk.
The whole thing is a python application.
The file environment.yaml includes all dependencies required for running Stable Diffusion.
They recommend conda for managing application environment and dependencies4.
# Run this at app root folder where environment.yml is located
conda env create -f environment.yml
conda activate ldm
Creating a new conda environment for Stable Diffusion takes time; it needs to download several packages5.
Once the environment ldm activated, it is now ready.
Using Stable Diffusion
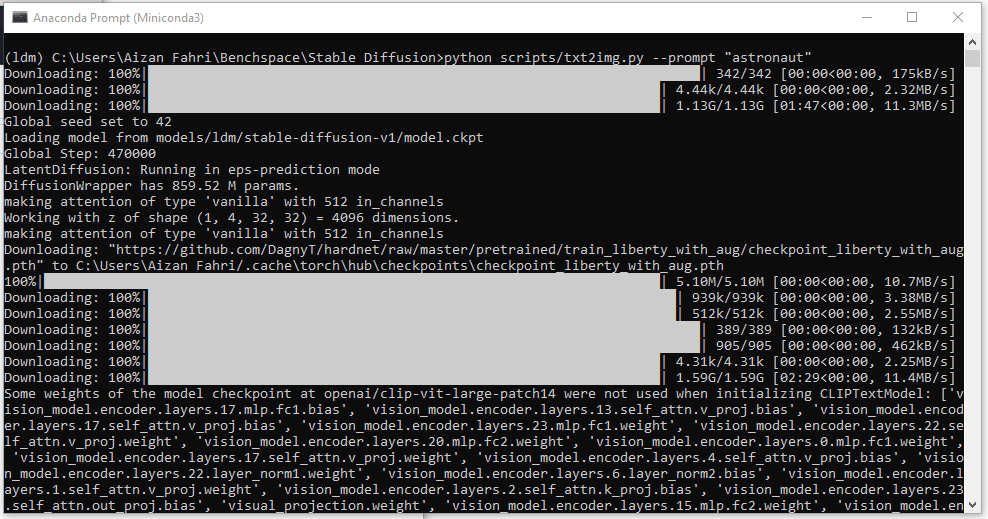
I had no idea what was going to happen when I issued this command in the application root directory:
python scripts/txt2img.py --prompt "astronaut"
… and soon after, it started downloading more stuff, more than 2 GB of data. I had no idea what were these, so I started investigating.
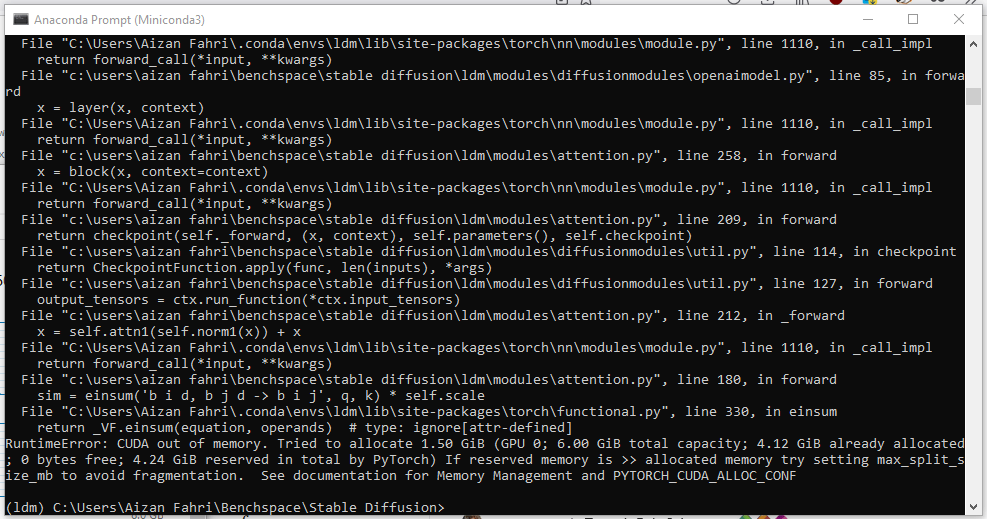
But before I started investigating, I got error from CUDA.
RuntimeError: CUDA out of memory. Tried to allocate 1.50 GiB (GPU 0; 6.00 GiB total capacity; ...)
I tried re-running again and monitored the GPU VRAM usage:
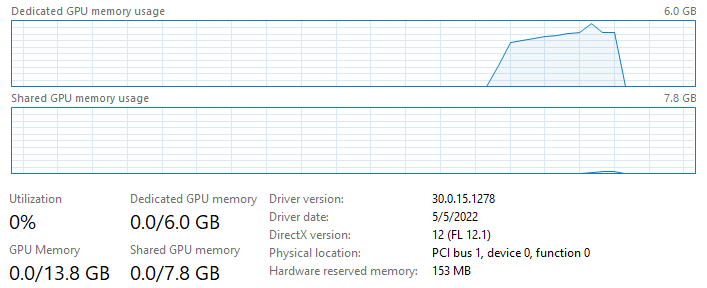
It got that huge increase hitting around 5.8GB of VRAM and then it stopped….
Well, this was not great.
Clearly here 6GB of dedicated VRAM was not enough.
I tweaked the command in several ways;
(i) using --W and --H down to 64 (from default 512?) to reduce the resolution, did not work;
(ii) running with --plms (no idea what it does), still did not work;
(iii) decreased the iteration and samples with --n_iter 2 & --n_samples 1, still did not work.
I guess I would need a faster and beefier GPU. So… time to rent one?
As of note, at time of writing there existed Stable Diffusion forks: bes-dev/stable_diffusion.openvino for running on Intel CPU; hlky/stable-diffusion comes with “idiot-proof web GUI”; and basujindal/stable-diffusion reportedly can run on GPU with smaller dedicated VRAM.
Another Attempt
I was interested to run basujindal/stable-diffusion fork because their documentation said just download the optimizedSD folder instead of cloning the whole repo from scratch.
# Careful pasting this if you are on Windows
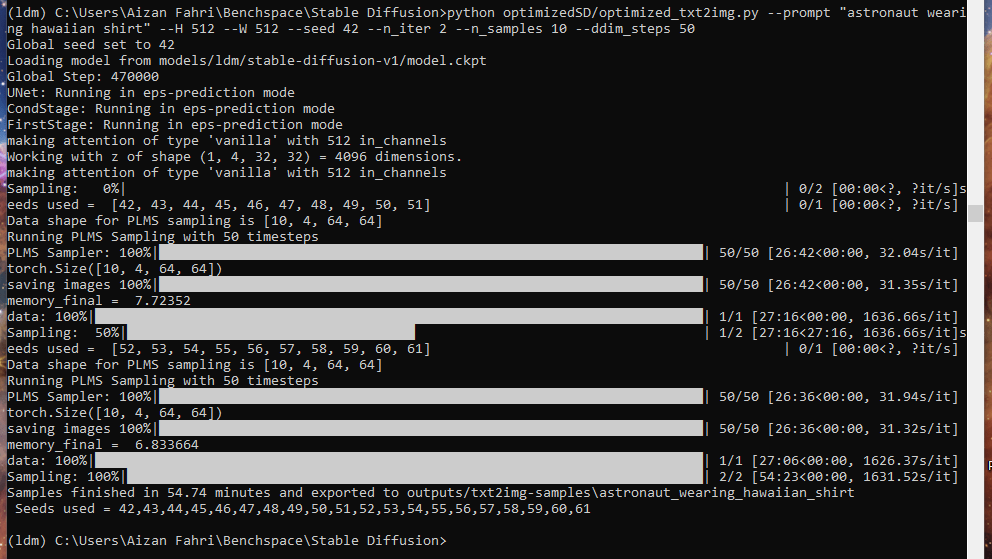
python optimizedSD/optimized_txt2img.py --prompt "astronaut wearing hawaiian shirt" \
--H 512 --W 512 \
--seed 42 --n_iter 2 \
--n_samples 10 --ddim_steps 50
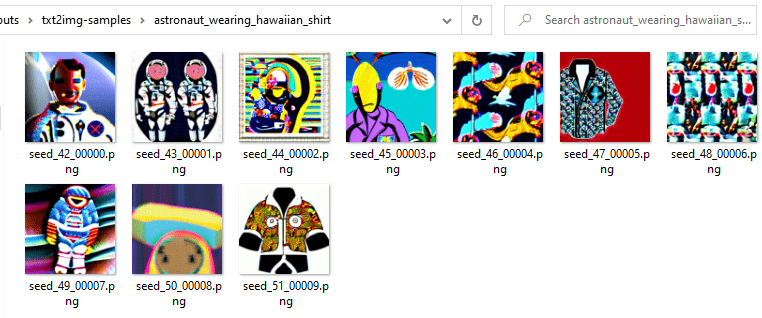
No more error due to insufficient VRAM. It topped at 3.7GB VRAM and running quite hot (70 °C, very audible fan) and it took very long to finish. I did not measure how long, but maybe roughly 40 minutes6.
This clearly does not scale. And it did not work.
Not dissuaded, I tried again.
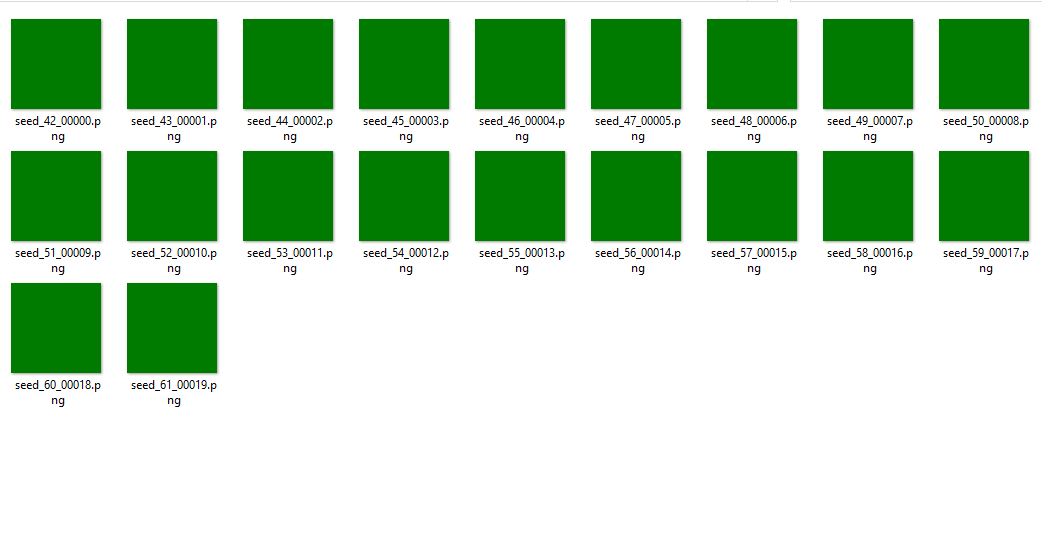
This issue on CompVis/stable_diffusion repo suggested that --precision full parameter might help to resolve the green-only image output.
# VRAM usaged topped at 4.6GB
# Ran within 5 minutes
python optimizedSD/optimized_txt2img.py --prompt "astronaut wearing hawaiian shirt" \
       --H 256 --W 256 \
       --seed 42 --n_iter 2 --n_samples 10 \
       --ddim_steps 50 --turbo --precision full
… and it worked, but can’t say I like them.
I tore down the whole thing and went to sleep. It was already 1:00 AM.
2 Cups of Coffee for Faster Run
At $9.99/month, Google Colaboratory feels very affordable7. I spent $5 for a cup of latte, so I guess this is a good investment8. But first, let’s try if we could use the free version without paying anything.
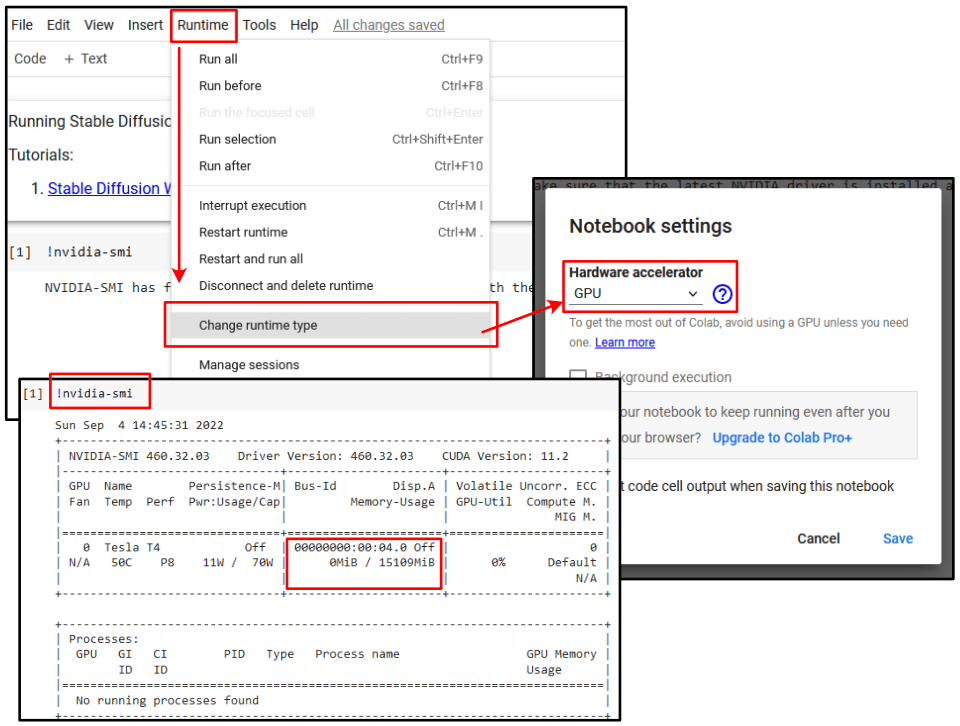
By default, a Colab notebook does not use hardware acceleration.
I went to Runtime, clicked on Change runtime type, selected GPU as my hardware accelerator.
Running !nvidia-smi (SMI = system management interface), I could see roughly 16GB of dedicated VRAM was allocated to my notebook.
That’s a lot of VRAM.
The actual card might not be really fast though, so I ran this command to check what kind of card I got.
# Input
!nvidia-smi --query-gpu=gpu_name,gpu_bus_id,vbios_version --format=csv

# Cell output
name, pci.bus_id, vbios_version
Tesla T4, 00000000:00:04.0, 90.04.A7.00.01
It was a Tesla T4 GPU, a Turing-based card, launched in September 2020.
This was not too bad then.
Then, I basically followed these tutorials: How to Generate Images from Text with Stable Diffusion Models and Stable Diffusion with diffusers.
As a quick note, here’s the GitHub repo for the diffusers python module.
It simplified the whole installation process (assuming CUDA is available for Jupyter session).
# Each commented block was run on separate cell

# Install the required packages
!pip install diffusers==0.2.4
!pip install transformers scipy ftfy
!pip install "ipywidgets>=7,<8"

# Enable widgets because by default Colab disables them
from google.colab import output
output.enable_custom_widget_manager()

# Once widgets enabled, login to HuggingFace using token
from huggingface_hub import notebook_login
notebook_login()

# Loading the model
import torch
from diffusers import StableDiffusionPipeline

# make sure you're logged in with `huggingface-cli login`
pipe = StableDiffusionPipeline.from_pretrained("CompVis/stable-diffusion-v1-4", revision="fp16", torch_dtype=torch.float16, use_auth_token=True)

# Move the inference to CUDA
pipe = pipe.to("cuda")
All the prep work was done, time to try it
from torch import autocast

prompt = "a photograph of mouse wearing lab coat"
with autocast("cuda"):
  image = pipe(prompt)["sample"][0]

# Now to display an image you can do either save it such as:
# image.save(f"astronaut_rides_horse.png")

# or if you're in a google colab you can directly display it with
image
And… it took less than half a minute.
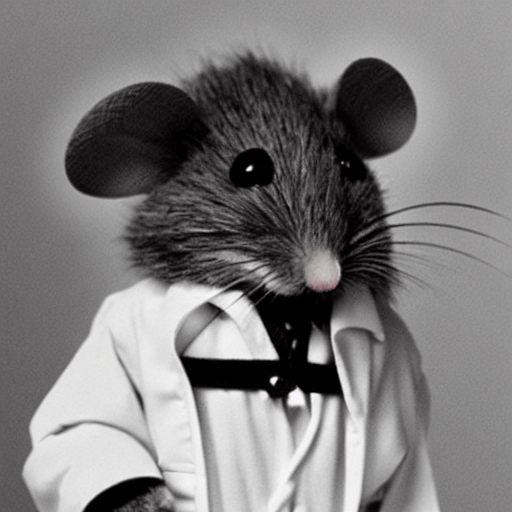
Incredible! Beyond words!
Machine Learning with GPU
Stable Diffusion is cool, I had fun with it. I also tried DALL-E (OpenAI) and Mini DALL-E (HuggingFace). Even crazier, Stable Diffusion can now be used in Photoshop through alpaca, and I suspect similar innovations would follow soon. It is not beyond imagination that content creation platforms (e.g. blogging platforms) would start incorporating Stable Diffusion for image generation. AI content generation will surely be debated and discussed as its societal implication is truly massive.
Personally, I thought this was a fairly great learning experience on learning how to use Google Colab with GPU runtime. I dreamed of running UMAP with CUDA backend. My research data is in the multi-gigabytes territory with more than 14 parameters, comprising hundreds of million individual data points9.
Cannot wait to try it out now.
-
No, not really. I need to study and plan my experiments and my life after PhD, but we need to chill sometimes, don’t we? ↩︎
-
I have nothing against cloud stuff. DALL-E takes away all the hard work of setting up the system. Stable Diffusion makes you work for it, which is cool because we could learn something from setting it up. ↩︎
-
15.6 inch, Ryzen 7 3750H, 6.0 GB dedicated VRAM. This spec is somewhat bare minimum. ↩︎
-
Recently I removed
minicondain favor ofpipenv. I likepipenvbetter in term of how it resolves dependencies. I re-installedminicondabegrudgingly and make sure at install time it won’t manage my python. The reason why I could not get away withpipenvwas because theenvironment.ymlfile listedcudatoolkit, which is only available throughconda. Also in my experience,condawas never fast. Convenient? Maybe. ↩︎ -
Roughly 7.11 GB? That’s a lot of stuff this thing pulled down. I hope I overestimated since I only checked the folder size by right-clicking
~/.conda/pkgsdirectory. ↩︎ -
Which sounded about right. It ran at 32 seconds per step (n steps = 50), so roughly 27 minutes per iteration (n iteration = 2), which sums up to roughly 50 minutes per run. Reducing the pixel size down to
--Hand--Wof 128 helped to bring speed up to 5 seconds per step. ↩︎ -
I looked into alternatives. A quick Google search gave me Paperspace Gradient. After reading it quickly, Google Colab has a better free tier. Gradient has a cheaper (by $2) for their starting plan, at $8/month. The best part about Gradient is that it is (as of writing) region-locked. Read more here: Free GPUs for Machine Learning: Google Colab vs Paperspace Gradient. ↩︎
-
At the time of writing, I was interested in RTX 3060 (12GB VRAM), currently priced at $400. 40 months of Google Colab vs. a GPU (in this economy?), I will stick with Colab. Good thing is that nowadays I am more of a console gamer (sweet sweet PS5), so I don’t need a gaming GPU just yet. ↩︎
-
See this post: Measuring Batch Effect for Flow Cytometry Experiments. ↩︎