Before we go any further, I would like to announce that finally the bridged adapter on my linux virtual machine (Virtualbox) now works. Before this I had to use NAT, which is a boring networking setup. How did I do it? This time I played around with the Adapter Type. Previously, I used the default option Intel Pro/1000 MT Desktop. I changed that to PCnet-FAST III (Am79C973) and it now works!
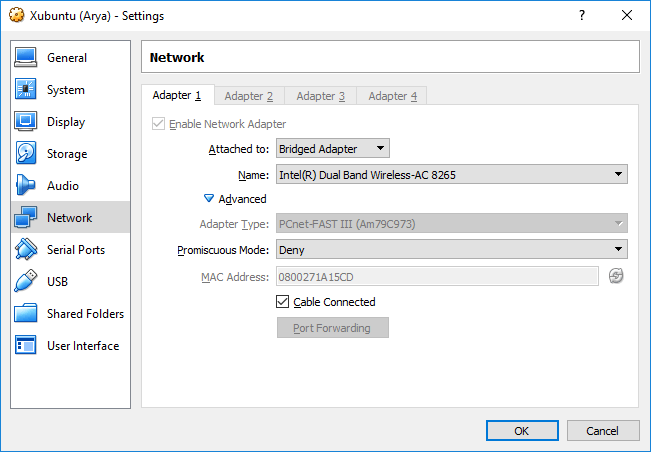 Bridged Adapter, Virtualbox.
So today I tried installing the linux VPN client (on my virtualized guest Xubuntu 17.10) to connect to the Private Internet Access (PIA). However, the VPN client seemed to have an issue with the UI and I ended up removing it, then installed the client on the host Windows 10 machine.
Soon after that, my linux guest machine could not connect to the internet anymnore. A short diagnostic with the ping command revealed this error: Temporary failure in name resolution. I tried changing the DNS via the Network Manager applet, it did not work. Then, I bumped into something that could be the cause: resolv.conf file in the /etc/ folder.
The resolv.conf was generated by the Network Manager. The content looked pretty off: the nameserver was set to 127.0.0.1. I tried changing it to something usable like the Google Public DNS server 8.8.8.8, but the change did not persist after a system restart. I booted up the Xubuntu 17.10 VM on my Macbook Pro to compare and inspect the resolv.conf file, and found out that the file symlinked to the systemd’s resolv.conf.
Just to be clear: the problem was on the Xubuntu VM (Windows 10 host).
So I ran this command:
sudo mv /etc/resolv.conf /etc/resolv.conf_bak
sudo ln -s /run/systemd/resolve/resolv.conf /etc/resolv.conf
These two commands fixed the issue, but then here it came another one. I noticed that the IPv6 did not work when I tried running sudo apt update and pinging google.com over the IPv6. Disabling the IPv6 should work, right? Edit the /etc/sysctl.conf to add these three lines at the end of the file:
net.ipv6.conf.all.disable_ipv6 = 1
net.ipv6.conf.default.disable_ipv6 = 1
net.ipv6.conf.lo.disable_ipv6 = 1
Refresh the configuration by issuing this command:
sudo sysctl -p
And verify that the change has taken effect with:
cat /proc/sys/net/ipv6/conf/all/disable_ipv6
If this command returns 1, IPv6 now has been deactivated. However, this change does not persist after a reboot. To make sure it persists permanently, the grub must be notified. Open the /etc/default/grub file and find this line:
GRUB_CMDLINE_LINUX_DEFAULT="quiet splash"
Change it to:
GRUB_CMDLINE_LINUX_DEFAULT="ipv6.disable=1 quiet splash"
And update the grub by issuing sudo update-grub. That should work.