This article does not intend to be a full-fledged installation of different virtual private network (VPN) systems. When I was writing this, they were few things that I was unsure, hence I will leave those portions for you to figure them out by yourself.
Think this article more or less as a review article. I was experimenting with OpenVPN Access Server, Pritunl, SoftEther VPN, custom installation of OpenVPN using script, installing IPsec from scratch, and installing IPsec by using script. The VPN server was spawned from Vagrant box running Ubuntu 14.04 Trusty LTS connected to a network via bridged interface.
fact sheet
- OpenVPN Access Server (free for 2 simultaneous user connections)
- Pritunl (open source OpenVPN server with premium subscription)
- SoftEther VPN DigitalOcean tutorial
- OpenVPN road warrior installation script
- Simple setup IPsec L2TP VPN script
The motivation to do the testing came from a short reading on pfSense, which was this article on NixCraft: Howto Configure PFSense Site-to-Site IPSec VPN Tunnel For Remote Access. I thought the pfSense could be installed as a package on any Linux distro, but I was disappointed to know that pfSense is a full-blown Linux distro designed to be a router system.
Then I started googling for viable solutions, and from that point I found Pritunl, OpenVPN Access Server, tutorial on SoftEther VPN, and the quick install scripts for OpenVPN and IPsec. I did not want to use a buck to buy even a cheap OVZ server, so all the experiments were done by using Ubuntu Trusty LTS running on Vagrant (VirtualBox).
notes on Pritunl
Perhaps the best, the easiest, and less intimidating solution to run an enterprise-class OpenVPN server. Its getting started tutorial is straightforward.
sudo add-apt-repository -y ppa:pritunl
sudo apt-get update
sudo apt-get install -y pritunl
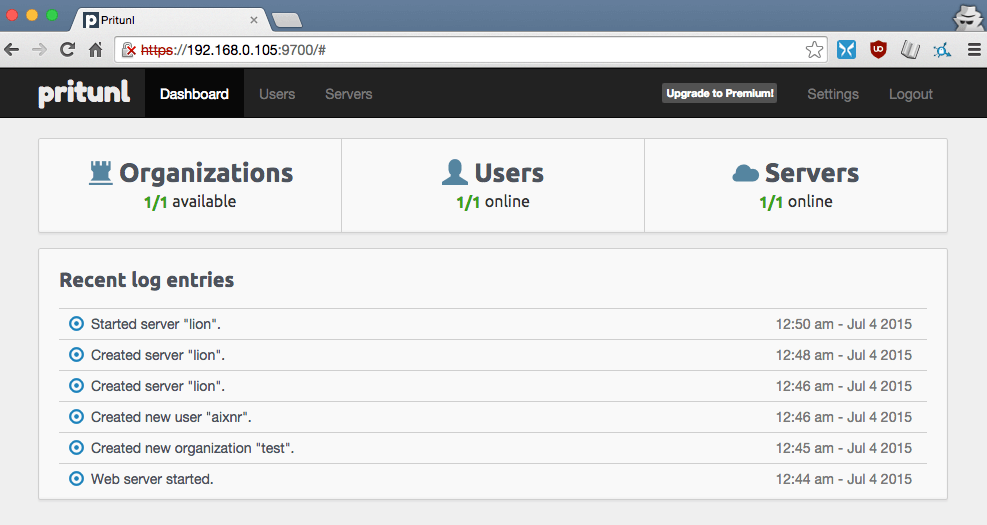
Then head to the Web UI by accessing through the https://<ip-address>:9700. The tutorial is really helpful, so I just leave you here. Pritunl comes with applet for Ubuntu, Archlinux, and soon for Windows and OSX. Its free subscription is great enough for starters, and more than sufficient for personal use.

The memory usage when I was testing it was in the vicinity of 270 MB. Pritunl installs MongoDB (its database backend for storing configurations). If you do not want to run MongoDB locally, here you go: mongoLab.
notes on OpenVPN Access Server
A quick comparison: Pritunl is better. OpenVPN Access Server with free subscription comes with 2 concurrent conenctions only, and you need to pay if you are planning to have more users using it. In term of memory consumption, it was hovering around 320 MB RAM.
From my experience the installation was fairly straightforward. I downloaded the .deb package, run dpkg -i to install it, and then when the installation was done I was told to direct my browser to 127.0.0.1:943/admin to open the admin web UI, and prior to that I needed to change my password by running the command passwd openvpn.
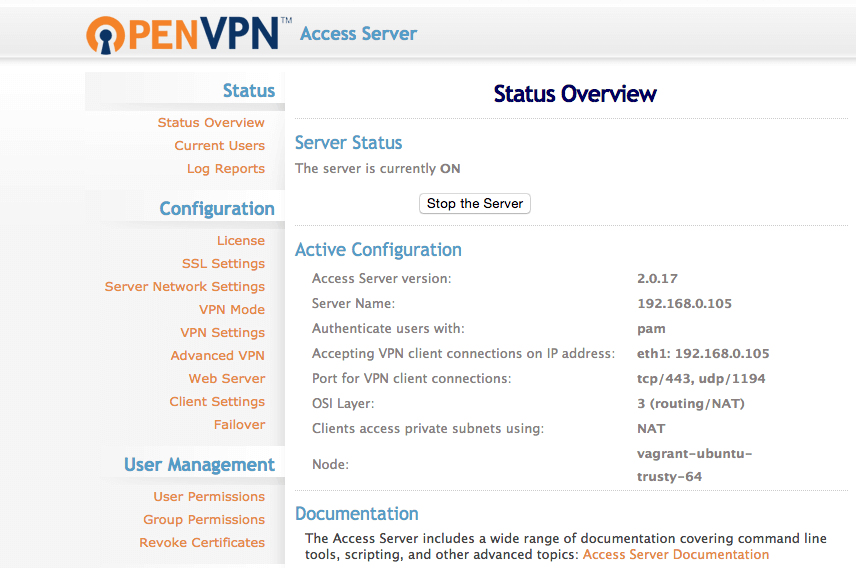
Except that it did not went well. The installation was done inside a headless Vagrant box, so it was obvious that I could only access the server on the host computer. I had to change the IP address in which the admin UI could be accessed via web browser. To do this, I had to run the OpenVPN Access Server’s init script.
cd /usr/local/openvpn/bin/
sudo ./ovpn-init
Then when I got the IP address of the web UI set to the Vagrant’s front-facing address, everything was good to go with no issue. For the OpenVPN AS CLI tool, we can use the sacli script, located at /usr/local/openvpn_as/scripts/.
notes on SoftEther
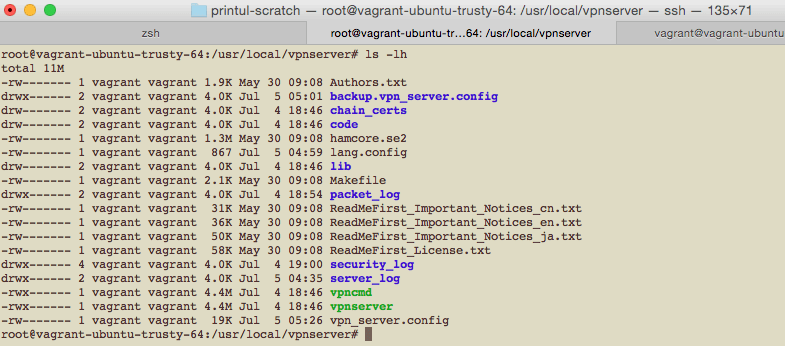
SoftEther is quite lightweight. To install, SoftEther has to be downloaded via its official website, and then it has to be compiled (just follow the DigitalOcean tutorial). The binaries, vpncmd and vpnserver are very lightweight, each is 4.4 MB in size.
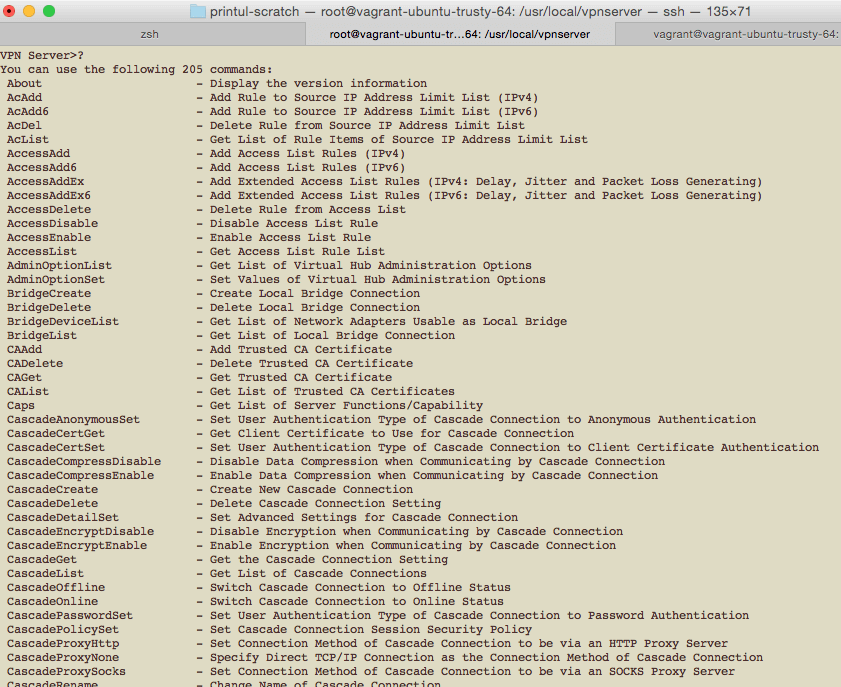
SoftEther comes with its own console, which is pretty good I must say. It comes with a lot of commands and tools to set up VPN system of different protocols. Oh yeah, holy cow 205 commands!
With the robustness SoftEther packs in 2 binaries, unfortunately, I couldn’t get it done right. Tried connecting the L2TP VPN on my iPhone, it did not work. Tried the IPsec LT2P configuration to connect to the server on my Xubuntu, still it did not work. Tried with OpenVPN server bundled in the SoftEther, failed to connect. Perhaps one fine day I will revisit the whole thing again.
And this was the point I decided to install IPsec LT2P from scratch.
Versatility comes at a cost, or I am not smart enough to cater its beauty.
notes on installing IPsec L2TP from scratch
# on client
sudo apt-get install l2tp-ipsec-vpn
This time I brought my luck again to test the water to see how well it would swim, only to realize it was drowning really bad. The installation process went pretty smoothly, thanks to this tutorial on Raymii.
# required packages for IPsec server
sudo apt-get install openswan xl2tpd ppp lsof
All I did was that I followed the tutorial with almost no modification, except that I freaked out when there was a conflict with the adapter. But after I did a search on Google, I could not find a single answer that would lead to a conclusive end without having to fiddle around with configurations, especially the iptables. And someone on the mailing list said it is a bug.
When all looked good, I tried connecting to the IPsec L2TP VPN on my iPhone, to no avail. Tried again on my Xubuntu (running on VirtualBox), I was greeted with this error:
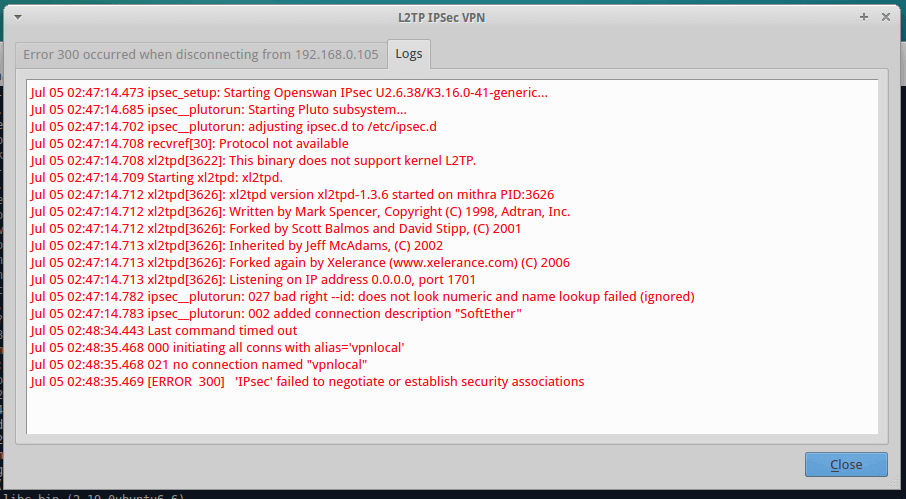
Then I checked what /var/log/syslog had for me.
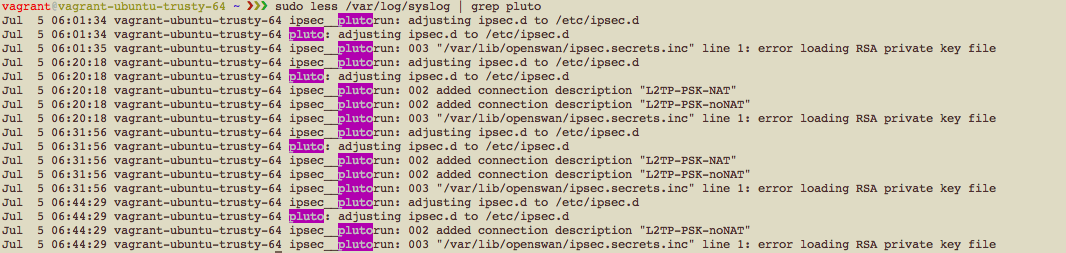
I didn’t know what’s happening, and with a heavy sigh I told myself “okay I am through.” Okay case closed. Let’s try the script.
notes on installing IPsec L2TP by using script
The more I was doing it on my Vagrant, the more I had this thought that local setup wouldn’t work. At this point I was considering to stock up a new server, the 128 MB plan offered by RamNode.
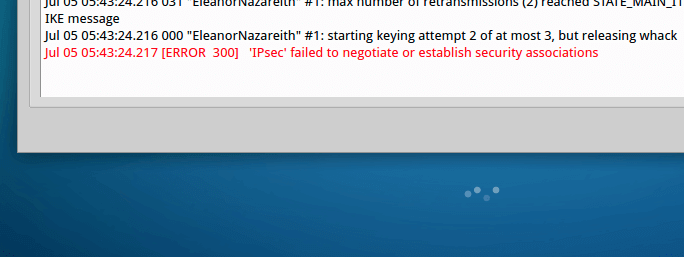
As usual, I couldn’t get it to work even with the helpful install script.
And I was bit restlessness when I encountered this while running the script:
Detected your server's external IP address: 69.xx.xxx.xxx

Are you on Amazon EC2?
If you answer no to this and you are on EC2, clients will be unable to connect to your VPN.
This is needed because EC2 puts your instance behind one-to-one NAT, and using the public IP in the config causes incoming connections to fail with auth failures.
yes
The IP address that will be used in the config is xx.x.x.xx
But… but… sudo netstat -plunt gave me this:

My hunch was on the right track. I should stock up new OpenVZ VPS.
notes on installing OpenVPN
But I hadn’t quite done testing them all. This is the last one before going online.
In short, I couldn’t get this done correctly on local Vagrant box.
penultimate thoughts
Both install scripts for IPsec L2TP and OpenVPN seemed to work perfectly fine on live servers (based on reviews that I found on the internet, and I forgot to bookmark them). I would attempt to install the VPN systems on a server. I had this thought that the problem connecting to the Vagrant box (bridged network setup) was that my computer (the host) itself was behind NAT. And also, I would incline to say that my SoftEther setup got stuck because of the same reason. Not a best thing to have a VPN server sitting behind a NAT, a reason you do not install a VPN server on an Amazon EC2 instance.
If I had extra time, I’d certainly trying to play around a lot more. And for the final playground, I would like to take a short tour playing with Avahi, inspired by this tutorial. Easier to discover a connected node on the same area network with hostname, certainly! Thanks to mDNS!
sudo apt-get install avahi-daemon
On another computer lying on the same network, ping!
# don't forget to append .local
# pinging my Vagrant box
ping vagrant-ubuntu-trusty-64.local
Hooray!! Thanks to this thread on Ask Ubuntu.
zen@mithra ~/Downloads % ping vagrant-ubuntu-trusty-64.local
PING vagrant-ubuntu-trusty-64.local (192.168.0.106) 56(84) bytes of data.
64 bytes from 192.168.0.106: icmp_seq=1 ttl=64 time=0.921 ms
64 bytes from 192.168.0.106: icmp_seq=2 ttl=64 time=0.576 ms
64 bytes from 192.168.0.106: icmp_seq=3 ttl=64 time=0.535 ms
64 bytes from 192.168.0.106: icmp_seq=4 ttl=64 time=0.545 ms
64 bytes from 192.168.0.106: icmp_seq=5 ttl=64 time=0.643 ms
64 bytes from 192.168.0.106: icmp_seq=6 ttl=64 time=0.573 ms
And this simple experiment (but it worked) was the delicious cherry on top… sitting idly on minefield of despair. I think I incorrectly applied that idiom.
final notes and conclusion
At this point maybe you thought the saga had ended. I had the same thought too, but befall unto heroes plot twists to not let them stay in the realm of mediocrity. I looked at the servers that I had, and picked the one that had more RAM space. There was one underutilized OpenVZ VPS sitting somewhere in Europe, so I gave a spin to try the OpenVPN and IPsec L2TP systems (installed using the aforementioned scripts). Here is what happened.
OpenVPN road warrior script: it worked!
IPsec L2TP install script: it did not work.
The installation and configuration for both of the systems were bloody hell fast (not joking!), and I was stoked to know that the installation and configuration ended less than 5 minutes. OpenVPN worked fine, so let’s not talk about that. Our focus here is on the IPsec L2TP. What happened? I took a peek at the /var/log/syslog file:
# reading the file
sudo cat /var/log/syslog | grep "pluto"

# returned output
Jul  5 05:11:07 nazareith pluto: pluto: warning: chdir("/var/run/pluto/") to dumpdir failed (2: No such file or directory)
Jul  5 05:14:54 nazareith pluto: pluto: warning: chdir("/var/run/pluto/") to dumpdir failed (2: No such file or directory)
- nazareith is the hostname
- pluto is the daemon of the IPsec
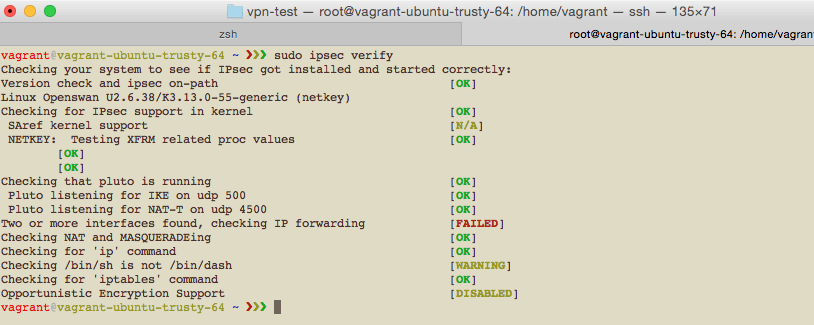
Then, with discouraged fingers I took a peek at the sudo ipsec verify output:
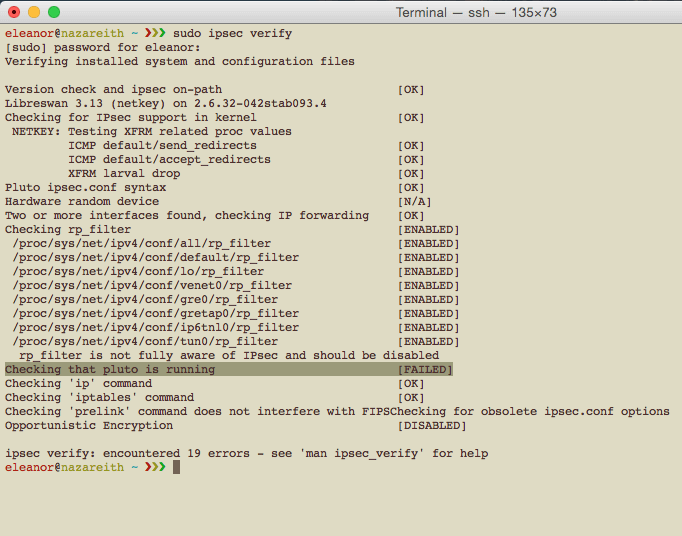
Why? Why? Why? After reading this and this, I drew the conclusion that the IPsec’s pluto daemon couldn’t run on OpenVZ VPS, which then led me to formulate a strategy to install it on KVM-based VPS.
But I did have the luxury of time.
To wrap this all up,
- Pritunl has the best solution for fast OpenVPN installation, and pleasing GUI configuration. I would recommend 512 MB VPS for small setup (around 10 - 20 concurrent connections).
- I would not recommend OpenVPN Access Server. The limitation of 2 concurrent users for free license dwarfs the software itself.
- OpenVPN road warrior script is the best script. Super fast installation, and easy configuration. Re-run it again to add more users.
- IPsec L2TP is a piece of technology that falls behind OpenVPN in term of security features and memory footprint, according to iVPN. The reason why I was eager to get it installed was because iOS has native IPsec support without having to install any 3rd party tools.
- Life is short.