The thought of setting up a VPN server had been nagging me, but usually I put off such plan because installing either OpenVPN or IPsec L2TP services would usually take a while to finish, assuming everything would go well. But then, I was pretty sure that well-maintained Docker images for the aforementioned open source VPN implementations were available, somewhere.
So, let’s try doing it?
IPsec L2TP
Currently I am using the hwdsl2/ipsec-vpn-server Docker image to serve as the IPsec L2TP VPN server. The installation process is well-documented on its GitHub page, but for brevity I am going to write the commands I issued:
First, pull the Docker image:
docker pull hwdsl2/ipsec-vpn-server
Create the environment file for credentials, e.g. ~/.ipsec.env with the following examples (change the values as you see fit):
VPN_IPSEC_PSK=sharedpass
VPN_USER=user
VPN_PASSWORD=userpass
Then, launch the image:
docker run \
    --name ipsec-vpn-server \
    --env-file ~/.ipsec.env \
    --restart=always \
    -p 500:500/udp \
    -p 4500:4500/udp \
    -v /lib/modules:/lib/modules:ro \
    -d --privileged \
    hwdsl2/ipsec-vpn-server
If there is a firewall installed and running (e.g. UFW), allow ports 500 and 4500 (UDP).
Currently I am using this IPsec L2TP only for mobile browsing because apparently it is really easy to set up compared to OpenVPN on iOS. To use VPN on Linux (e.g. mine is Xubuntu 17.10), I found out that it is a little bit difficult to set up an IPsec L2TP connection. This is the reason why I also run an OpenVPN server.
Turned out, it also was a challenge.
OpenVPN and DNS
Borrowing the same theme as installing an IPsec L2TP server (as shown above), the installation of an OpenVPN server can be done by using a Docker image. Let’s go ahead and pull the image.
docker pull kylemanna/openvpn
And then, proceed with the installation. I prefer the docker-compose.yml way. Pay attention to the container_name, change it as you see fit.
version: '2'
services:
  openvpn:
    cap_add:
     - NET_ADMIN
    image: kylemanna/openvpn
    container_name: openvpn
    ports:
     - "1194:1194/udp"
    restart: always
    volumes:
     - ./openvpn-data/conf:/etc/openvpn
Then, let’s run the deployment:
docker-compose run --rm openvpn ovpn_genconfig -u udp://<server_ip_address>
docker-compose run --rm openvpn ovpn_initpki
docker-compose up -d openvpn
The first command with docker-compose up there runs the config generation and the (temporary) container will be destroyed afterward. The second command runs the initialization process to set up credentials and stuff, and the container will be destroyed afterward. The third command then runs the actual OpenVPN container that will serve encrypted traffic.
To generate the client’s (a.k.a user, i.e. me) credentials:
export CLIENTNAME="clientname"
docker-compose run --rm openvpn easyrsa build-client-full $CLIENTNAME
docker-compose run --rm openvpn ovpn_getclient $CLIENTNAME > $CLIENTNAME.ovpn
Pay attention to export CLIENTNAME, change it to something you like. The second command with docker-compose generates client credentials based on the provided CLIENTNAME and a password input prompt will show up. Finally the third command provides you with the .ovpn configuration file that you, as a client, will use to connect to the server. Later download this .ovpn file to your local computer (SFTP? FTP?).
To connect to the server on a local computer:
sudo openvpn --config clientname.ovpn
And here was where I had a problem with my virtualized Xubuntu 17.10 (Win10 host). Upon connecting with the OpenVPN server, I could not ping “google.com” anymore. After issuing the ping command, the terminal stared blankly at me and after a few minutes later the terminal returned nothing (I forgot the actual error message). Weird, so my detective works started. First, I tried looking for the evidence whether the remote OpenVPN and the local client were connected and could talk to each other or not. So, how do we do this?
First, we need to know the internal IP address assigned to the local client. By default, the remote OpenVPN server is assigned with the internal IP of 192.168.255.1. We can figure out the internal IP of the local client by observing the log right in the terminal after connecting to the OpenVPN server. For example, look at this terminal output after connecting to an OpenVPN server:
Sat Jan 27 09:53:14 2018 /sbin/ip link set dev tun0 up mtu 1500
Sat Jan 27 09:53:14 2018 /sbin/ip addr add dev tun0 local 192.168.255.6 peer 192.168.255.5
Sat Jan 27 09:53:14 2018 Initialization Sequence Completed
You will see in the second line that our local client has been assigned with the internal IP 192.168.255.6. To confirm local client’s connection with the remote OpenVPN server, try pinging 192.168.255.1. To confirm remote OpenVPN’s connection with the local client, first we need to get into the container with docker exec -ti <container name> /bin/bash and then try pinging 192.168.255.6. Then compare the latency from both pings: do they match?
The second test that I ran was pinging “google.com” from the remote OpenVPN. The expectation is that if I could ping “google.com”, that means the remote OpenVPN is indeed connected to the internet and can resolve the domain name system (DNS). I did the test and I confirmed that the remote OpenVPN server could resolve DNS just fine.
Then I ran the same test on the local client. I tried pinging “google.com” and its equivalent IP address (e.g. 216.58.192.142, depending on your geolocation). My local client could not reach “google.com” but I could ping 216.58.192.142 just fine. This, to me, screamed that something went wrong with the DNS resolution on my local client. At this point, I could feel a little bit relieved knowing that I narrowed down the problem down to only 1 machine: the local client and nothing was wrong with the remote OpenVPN.
To make sure this problem was unique to, at least, Xubuntu 17.10, I tried connecting to the remote OpenVPN server on my macOS by issuing the same command sudo openvpn --config clientname.ovpn (OpenVPN is installable with brew on macOS), and it worked just fine.
Let’s get this DNS problem solved, shall we?
It is always a good practice to do a quite google search to see if anyone had encountered this problem in the past. Using the specific keywords like “OpenVPN not resolving DNS Ubuntu 17.10”, I found out that this problem was due to the changes how recent Ubuntu and its variants thereof resolving DNS. Everything came together after I found this GitHub repository.
I went to the aforemention GitHub repository (which contains a helper script to update DNS), cloned the repository and then ran make to install the helper script. I then edited the content of /etc/nsswitch.conf as suggested by the GitHub repository, and I restarted the systemd-resolved service by running:
sudo systemctl enable systemd-resolved.service
sudo systemctl start systemd-resolved.service
Lo and behold, it did not work.
At this point, I was editing a bunch of files in the /etc/ folder, rolling back changes if my attempt at fixing the DNS resolution did not work. My memory now became a little bit hazy whether I restarted my local client or not. But I remember vividly that there was one change that fixed the issue. I edited the content of /etc/systemd/resolved.conf to add this line just right below the section [Resolve]:
DNS= 8.8.8.8 8.8.4.4
I was confused. I tried rolling back previous changes of installing the helper script (make -n install revealed where the helper script was planted), reverted the changes I made to the /etc/nsswitch.conf, but then I could resolve the DNS just fine after connecting to the remote OpenVPN server.
Dumbfounded, I called it a day. Still not quite satisfied, I tried connecting to the remote OpenVPN server from the virtualized Xubuntu 17.10 on my macOS. It worked just fine without any workarounds.
Anyways, let’s move on.
OpenVPN and IPsec L2TP stats
Since my OpenVPN and IPsec L2TP were deployed by using Docker containers, I was curious about their actual resource footprint. A quick docker stats command gave me this:
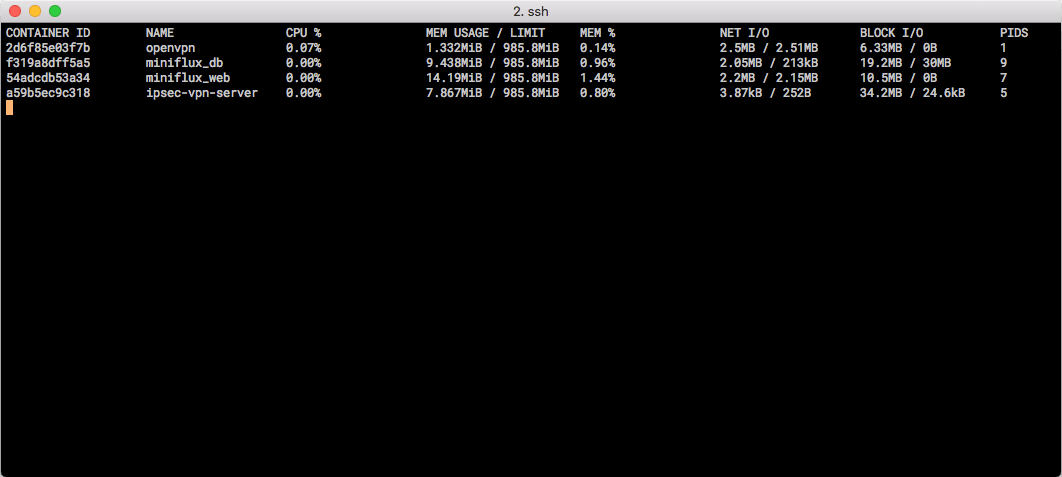 Docker Stats for my containers.
While being connected to a client, OpenVPN was using 0.14% (1.332 MiB) of the memory, while IPsec L2TP being idle with no active connection sat at 0.80% (7.867 MiB). On a 1GB RAM VPS instance (Digital Ocean, Amsterdam), this is pretty darn good.
This write-up is not intended to serve as a tutorial, rather illustrate that sleuthing for problems with networking could be tricky and time-consuming. Nonetheless, to me it was a great experience. The feeling of despair treading in a squalid dungeon will be then offset by the sight of the light at the end of the tunnel.