VS Code is pretty cool, the VSCodeVim extension is also pretty cool. However, deep in my heart I’ve always felt that Vim could offer speed unparalleled to anything else. I decided to come back to Vim, but now with neovim instead of vim. I have heard good things about neovim, so I decided this would be a good time to try it out.
.md files or writing short bash or python scripts, (neo)vim is more than enough.
Installing neovim
Ubuntu 18.04 LTS has nvim without adding PPA. However, it is quite outdated (as it is always the case for packages in the official repository), so I opted to download the official .appimage version (latest stable, 11 MB).
# Download stable release
curl -LO https://github.com/neovim/neovim/releases/download/stable/nvim.appimage

# Assign correct permission
chmod u+x nvim.appimage

# Move application to $PATH in /usr/bin/ directory
mv nvim.appimage /usr/bin/nvim
I downloaded junegunn/vim-plug to manage plugins.
sh -c 'curl -fLo "${XDG_DATA_HOME:-$HOME/.local/share}"/nvim/site/autoload/plug.vim --create-dirs \
       https://raw.githubusercontent.com/junegunn/vim-plug/master/plug.vim'
The init.vim config, located at the ~/.config/nvim/init.vim, was initially populated with these directives:
call plug#begin()
Plug 'tpope/vim-fugitive'
Plug 'scrooloose/syntastic'
Plug 'jiangmiao/auto-pairs'
Plug 'mbbill/undotree'
Plug 'kien/ctrlp.vim'
Plug 'junegunn/goyo.vim'
Plug 'tpope/vim-surround'
Plug 'rhysd/vim-grammarous'
Plug 'reedes/vim-pencil'
Plug 'vim-scripts/vim-auto-save'
Plug 'junegunn/fzf'
Plug 'junegunn/fzf.vim'
Plug 'vimwiki/vimwiki'
Plug 'avakhov/vim-yaml'
Plug 'joshdick/onedark.vim'
Plug 'vim-airline/vim-airline'
Plug 'vim-pandoc/vim-pandoc'
Plug 'vim-pandoc/vim-pandoc-syntax'
call plug#end()
The plugin system was then initialized inside an nvim session with the command :PlugInstall.
This list of plugins is mostly carried over from my previous ~/.vimrc configuration. For making sure that the vim-airline can display its fullest glory with the powerline/fonts, the patched fonts must be installed
# Download the fonts
git clone https://github.com/powerline/fonts.git --depth=1

# Change directory into fonts & then install the fonts
./install.sh

# Delete the cloned git repo afterwards
cd ../
rm -rf fonts
Currently I am using Meslo LG S for Powerline Regular as my font.
Vim keybindings
Because there are simply too many of them, these are few that I frequently have hard time to commit into my memory.
" Going up/down viewport (in normal mode)
C-e " going down
C-y " going up

" Invoke terminal & quit it
:term       " Calls a terminal
i           " Switches to terminal mode
<C-\><C-n>  " Leaves terminal mode

" Using the split to choose open buffer
:vsp #2        " open vsp with buffer number 2
:vsp file.ext  " alternative using the file name

" Open file in the buffer
:b file.ext    " Open buffer that has that name

" Move to a different pane in split mode
<C-w> <cursor>  " Press Ctrl+W, then use cursor key

" To kill an active buffer
:bd 2      " kills buffer number 2

" Delete a split
<C-w>q     " :q also works

" Selecting a word with text-object
" I put "v" here, so start these in normal mode
viw     " inner word
viwy    " as above, but yank the word
vis     " inner sentence
vip     " inner paragraph

" Paste from yank register after d command
"0p     " this would paste yanked object after a d command
Strategy for using neovim on Windows 10 PC
Well, I would like to use it on my PC very much. A tutorial on HTG shows how to use WSL by using the X Window System Server for Microsoft Windows called Xming, and I anticipated that I would face challenges to set this up. An old tutorial shows that this is possible when connecting to the VM through an SSH session, so forward I went with the plan.
Note on X server:
I found out Xming was noticeably slow when starting up an nvim session, issuing delete command with d in nvim, etc. I then tried VcXsrv. The performance improvement was obvious, however, it crashed when I tried running GIMP (it now worked with Nix’s version of GIMP, but it did not work with apt version of GIMP, so mostly GIMP’s issue).
Another thing was that I specified the compression scheme for the ssh session.
ssh -fYC -c aes128-gcm@openssh.com -p <port> user@server <program>
Where -f for forking into the background, -Y for enabling trusted X11 forwarding, -C for enabling compression defaulting to level 6, and -c for specifying the compression cipher.
I performed this operation inside a virtual machine running on Oracle VM VirtualBox. I prefer VM than WSL because I feel like I have more control. There is nothing wrong with WSL and I could see myself using WSL in the near future, given that the WSL v2 has marked improvements over the WSL v1.
Note on networking:
Previously, I was not able to use the host-only adapter. This time, per suggestions I read online, I installed VirtualBox by right-clicking and chose Run as administrator.
Prior to host system restart, I was not able to get host-only network to initialize inside the VM, but I could get it to work after a restart. I found out that when the subtitle of the host-only adapter being “WireGuard Tunnel” (pictured below), that was when I had this issue.
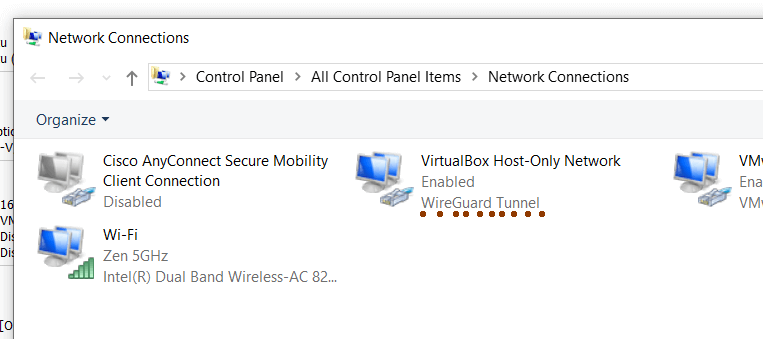
My solution was to have WireGuard running at the same time to prevent conflict (somehow that worked). Another simpler alternative would be using NAT with port-forwarding, which would skip hurdles associated with setting the host-only adapter up.
Somehow, only the first adapter (enp0s3) went up after boot. The second adapter (enp0s8) required a little bit of work, regardless being either NAT or host-only. This could be easily automated with crontab with root privilege after booting.
# Bring adapter up
sudo ip link set enp0s8 up

# Request address for that adapter
sudo dhclient enp0s8
I started with minimal headless Ubuntu installation and went from there. At the Software selection dialog during system installation, I selected OpenSSH server package only. At the end of the base installation, I exported the VM as ova image so that I do not have to install the whole thing from scratch again (total size was 1.05 GB).
# Routine system update & upgrade
sudo apt update; sudo apt upgrade

# Installing essential applications
sudo apt install vim htop zsh git python3-pip \
                 curl net-tools ncdu tmux screenfetch \
                 ffmpeg mplayer xsel
Installing more packages:
# Virtualbox guest additions
sudo apt install virtualbox-guest-additions-iso \
                 virtualbox-guest-utils \
                 virtualbox-guest-x11

# Reboot, and then check of vbox modules are running
sudo lsmod | grep vbox

# Change shell to zsh
chsh -s $(which zsh)

# Install xfce4-terminal
sudo apt install xfce4-terminal

# Make sure these settings in sshd_config are appropriately set
cat /etc/ssh/sshd_config
>> X11Forwarding yes
>> X11DisplayOffset 10
>> X11UseLocalhost no
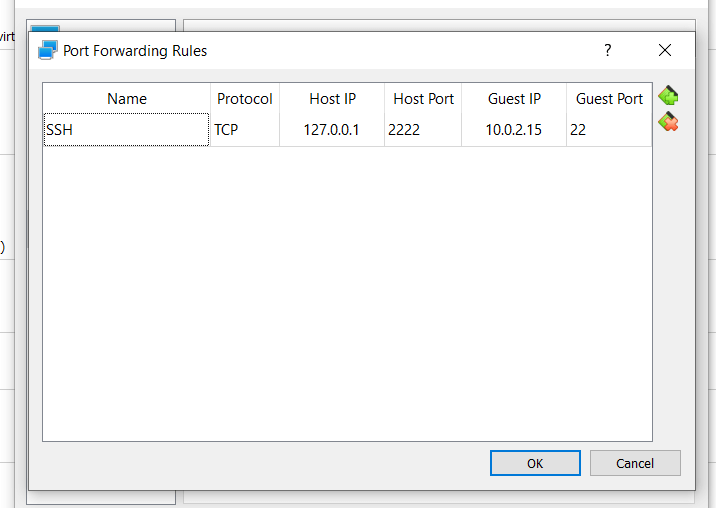
Since I decided to use NAT-only for the networking, I set up port-forwarding to allow access from the host into services running inside the VM.
I started a git bash terminal and prior to ssh-ing into the linux box, I set the DISPLAY variable pointing to Xming VcXsrv, and then I ssh‘ed into the box.
# Set display variable on host (in Git Bash terminal session)
export DISPLAY=localhost:0.0

# ssh into guest
# Assuming NAT 2222 on host to 22 on guest
ssh -Y -p 2222 aixnr@localhost
To make it easier to run applications within guest (detaching it from stdout):
# bash/zsh
function run() { nohup "$@" > /dev/null 2>&1 & disown; }
I also enabled folder sharing from host into the VM. Configuration is mostly done on the GUI of the VirtualBox.
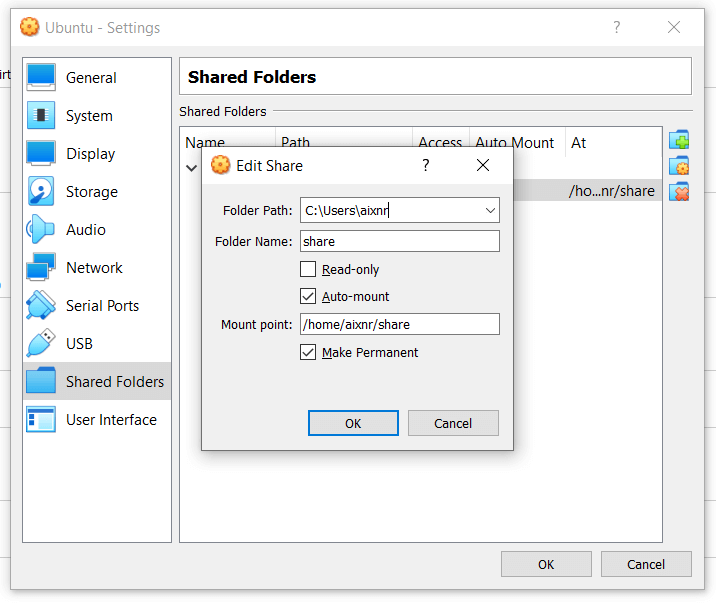
# Allow $USER (aixnr) to use shared folder
sudo usermod -aG vboxusers aixnr
sudo usermod -aG vboxsf aixnr

# Shared folder accessible at:
cd /media/sf_[share_name]/

# To make access easier, create symbolic link
sudo ln -s /media/sf_[share_name]/ $HOME/share/
Closing Words
I did try cygwin before to use my favorite CLI tools. However, it did not feel as immersive compared running the tools within an actual linux environment. I think this is the reason why macOS would be a logical choice for people that want the best of both worlds: painless aesthetic and the power of unix environment with CLI tools (mostly available through homebrew).
My only regret with my headless Ubuntu setup is that I only set the disk space at 10 GB only. Should have gone with 15 GB or beyond.