HTTPS/SSL is virtually free now and setting it up doesn’t require unicorn-level skills. I have successfully set up HTTPS/SSL on my Ghost blog, and secured my AWS S3 asset storage (for serving images) through the AWS CloudFront. During the course of getting this HTTPS/SSL implemented, I learned something new: content security policy.
Here I want to record my activities on getting my free SSL certificate from AWS Certificate Manager, setting up AWS CloudFront to serve asset from my AWS S3 bucket through HTTPS/SSL, upgrading insecure requests with CSP upgrade HTML meta-tag, and finally forcing HTTPS/SSL on Ghost Admin Panel.
AWS Certificate Manager
At first I tried using the combination of letsencrypt and letsencrypt-s3front plugin (GitHub), however, with virtually no success. I couldn’t get past through “incomplete authorization” error.
The idea here is I want to generate SSL certificate for my AWS CloudFront. All images on my blog are served from AWS S3 on plain HTTP. To serve image assets from S3 through HTTPS, they must be routed through CloudFront.
[HTTPS] internet -> CloudFront -> S3
At first, I thought this could be done with letsencrypt and its S3-CloudFront plugin. I gave up because of the “incomplete authorization” error, and I didn’t know how to fix it. Fortunately, I found out that AWS now issues free SSL certificates through AWS Certificate Manager to be used with any AWS services.
Setting up CloudFront
Amazon provides a good tutorial on how to request the certificate. When the certificate is ready, then we can use it with AWS CloudFront.
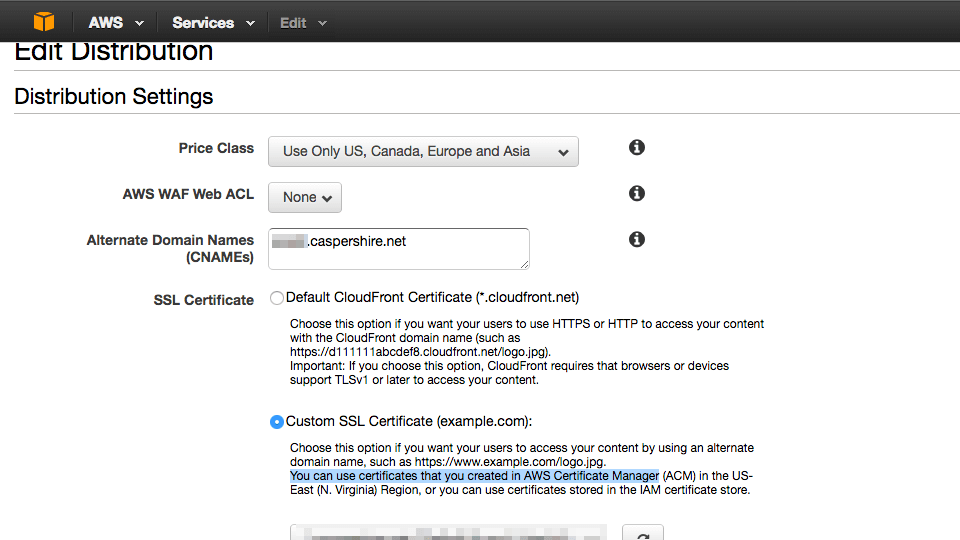
Here is one thing that threw me off. The domain name caspershire.net was pointed to use CloudFlare DNS to utilize their bleeding edge web technologies like HTTP/2, DNSSEC, etc. However, when serving with CloudFront Universal SSL, I couldn’t load the images. Upon inspection, I figured out that the images were stuck in nginx redirect loop. This thread on Stack Overflow seems to provide good explanation on what’s happening. In short, I couldn’t use CloudFlare CDN anymore because everything would go haywire. There might be tricks that I am not aware of.
CSP upgrade insecure request HTML meta-tag
I purchased custom theme from ThemeForest to be used with this Ghost blog. If I recall correctly, the browser reported no insecure content being served through plain HTTP. But when I activated the theme I purchased, the browser indicated that certain theme’s assets were being served through plain HTTP (a.k.a mixed content warning). This prompted me to investigate what’s happening in the theme, and this is when I found out about the content secure policy (CSP).
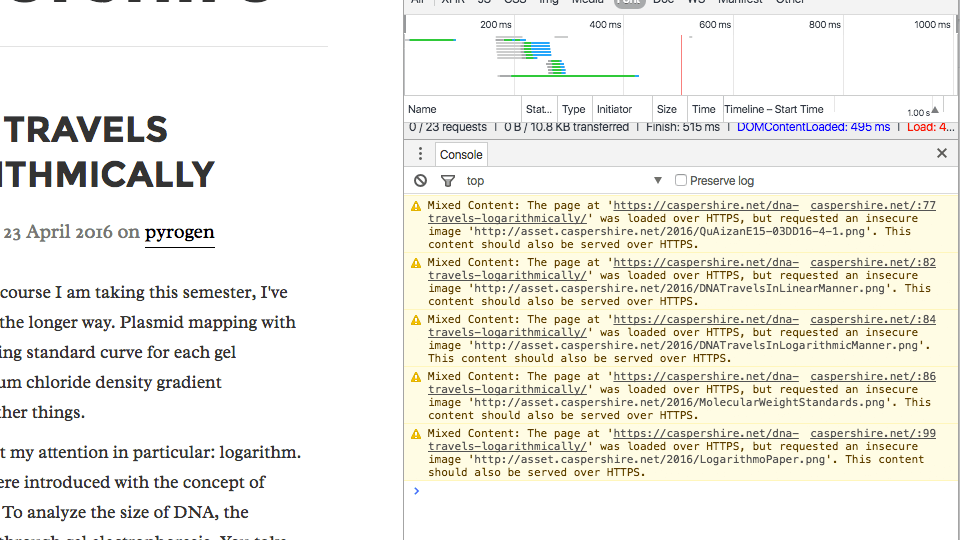
The fix is quite easy. I just need to add a new direct in the theme’s default.hbs to instruct the theme to upgrade the plain HTTP asset request to HTTPS.
<!-- upgrade insecure request with CSP -->
<meta http-equiv="Content-Security-Policy" content="upgrade-insecure-requests">
securing Ghost admin panel
By default, the Ghost admin panel serves request through HTTP. To enable HTTPS request, simply adding foreAdminSSL: true directive in Ghost’s config.js file.
production: {
    url: 'http://my-ghost-blog.com',
    forceAdminSSL: true
}
And here’s my nginx vHost file (reverse proxy and HTTPS)
server {
    listen 80 default_server;
    server_name caspershire.net;
    return 301 https://$server_name$request_uri;
}

server {
    listen 443 ssl http2 default_server;
    server_name caspershire.net;

    ssl_certificate /path/to/SSL/certificate.net/cert.pem;
    ssl_certificate_key /path/to/SSL/key.net/thekey.pem;
    add_header Strict-Transport-Security "max-age=31536000; includeSubDomains" always;
    ssl_ciphers EECDH+CHACHA20:EECDH+AES128:RSA+AES128:EECDH+AES256:RSA+AES256:EECDH+3DES:RSA+3DES:!MD5;

    location / {
        proxy_pass http://127.0.0.1:2368;
        proxy_set_header Host $host;
        proxy_set_header X-Forwarded-Proto $scheme;
        proxy_set_header X-Forwarded-For $proxy_add_x_forwarded_for;
  }
}
The server blocks for port 80 and port 443 are separated because it is a good practice to do so (I don’t have a good explanation on this).
Conclusion
Let’s Encrypt SSL certificate only valid for 90 days. When it first rolled out its own certificate authority (CA) to provide free certificates, some people were questioning “why 90 days, and why not a 365 days?”
The answer is that with 90 days, it offers better sense of security. Frequent update of the SSL key-pair will give any attacker narrower time-frame to extract captured packets, and in this case it would give a time-frame of 90 days instead of 365 days.
SSL certificates nowadays do not cost huge amount of money. Anyone with the capability to use it should try it.