Let’s establish the baseline with CPU-based transcoding, with both FFmpeg and HandBrake. All transcoding was performed on my computer that is powered by Ryzen R5 1400, ran once (ain’t nobody got time to do 3–5 replicates to make statistical measurements), with few applications open (Firefox, Chrome, file browser, and terminal). Closing web browser(s) is expected to yield a small boost by lowering the encoding duration. Or, someone can buy me Ryzen R9.
For the duration of the transcoding, I did not systematically record CPU temperature but it was well below 55 °C for most of the time. In addition, I tried as best to run the transcoding with default options without additional optimization to see how good the defaults are.
Versions:
- Distro: Ubuntu Bionic 18.04 LTS.
- FFmpeg through
snap, v4.2.1 (with--edgeflag). - HandBrake through
ppa:stebbins/handbrake-git-snapshots, unstable. - Nvidia driver v430 (minimum v418.30 required for
nvenc).
Caution:
FFmpeg through Ubuntu repository is outdated (v3.4.6 at the time of testing). As for HandBrake, the Git snapshot version (20190914125452) was used because even the ppa:stebbins/handbrake-release contains the outdated v1.2.1 for Ubuntu 18.04 LTS instead of the latest stable v1.3.0 that is available on Ubuntu 19.10.
Of note, ffbinaries website does provide pre-compiled binaries for latest stable FFmpeg, but they do not include nvenc support. While brew provides latest stable FFmpeg, it does not compile with nvenc.
Source file for the experiment: Dr. Stone #01, encoded by HorribleSubs.
- Original size: 477 MB
- Source video codec: H.264 at 24 FPS
- Resolution: 1280 x 720 (720p)
- Audio: MPEG AAC at 44,100 Hz (stereo)
- Subtitle included: Yes (ASS format)
$ ffmpeg -i "Dr. Stone 01.mkv" -c:v hevc output_hevc-default.mkv
The transcoding above ran for 12 mins 54 secs with the final output size of 102 MB (78.6% smaller than original size, or 4x smaller). This is crazy. I ran the process twice because I could not believe it and the results were consistent, +/- 30 secs difference.
x265 [info]: frame I:    349, Avg QP:24.58  kb/s: 10321.95
x265 [info]: frame P:   9464, Avg QP:29.64  kb/s: 908.73
x265 [info]: frame B:  24858, Avg QP:34.92  kb/s: 156.08
x265 [info]: Weighted P-Frames: Y:3.4% UV:2.4%
x265 [info]: consecutive B-frames: 11.2% 10.3% 9.6% 52.0% 17.0%

encoded 34671 frames in 776.22s (44.67 fps), 463.86 kb/s, Avg QP:33.38
took 776.31 seconds
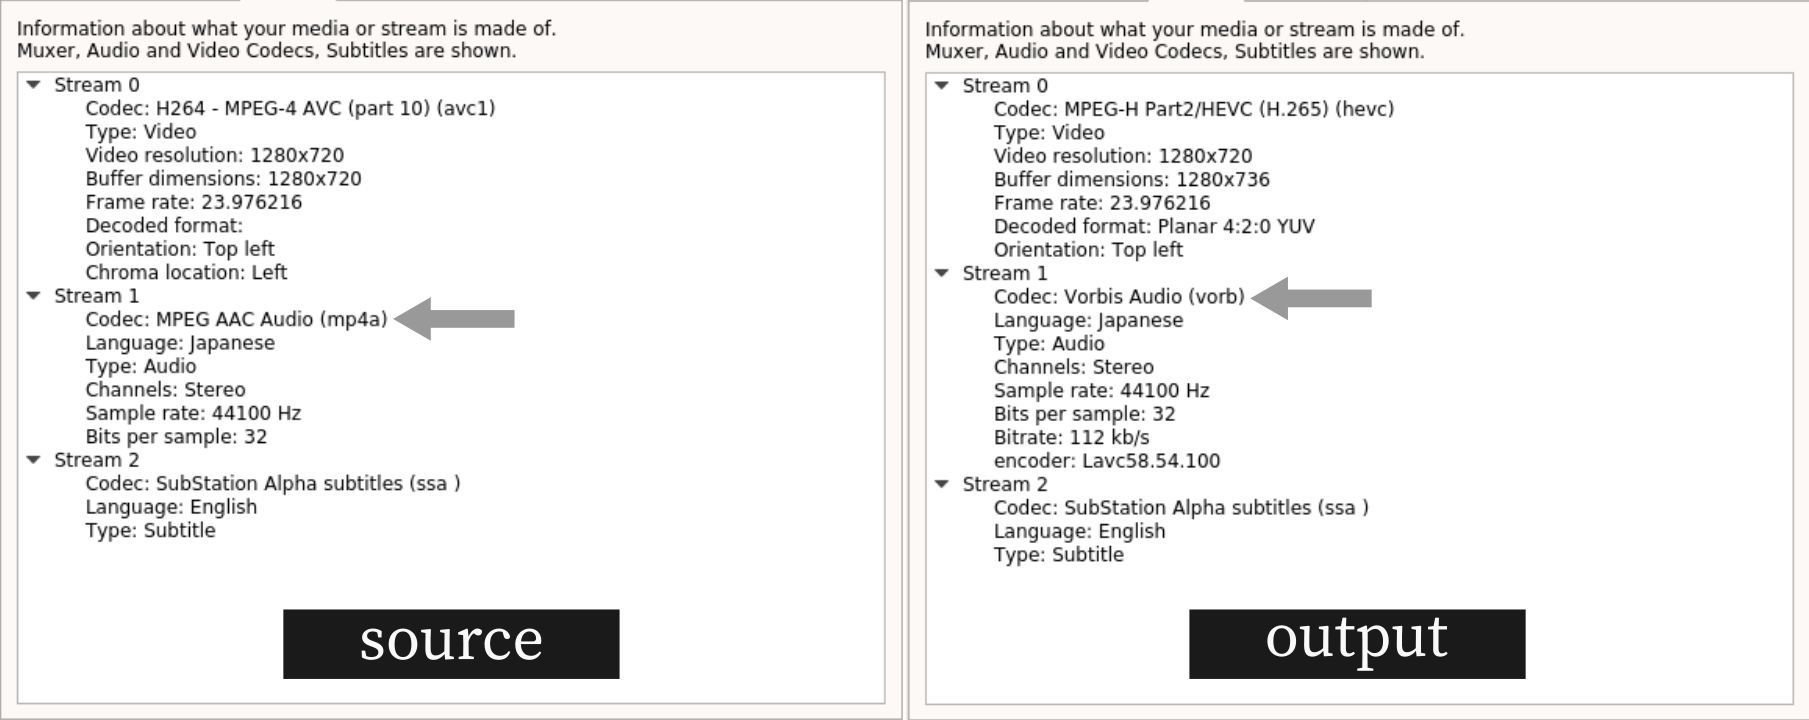
I checked the video, it ran fine with subtitle stream retained. Interestingly, the audio codec was transcoded from MPEG-AAC to Vorbis based on the stream description provided by VLC, even though I did not specifically ask FFmpeg to perform audio transcoding.
On HandBrake, all using default parameters, except setting the output framerate to 24 (default: 30) and container output format as Matroska .mkv (default: MPEG-4 .mp4). The container output format really probably does not matter, but the framerate would be a factor. The output excludes subtitle, but that would be less than 1 MB anyway (this is an assumption, not a fact, since subtitle files are not that big).
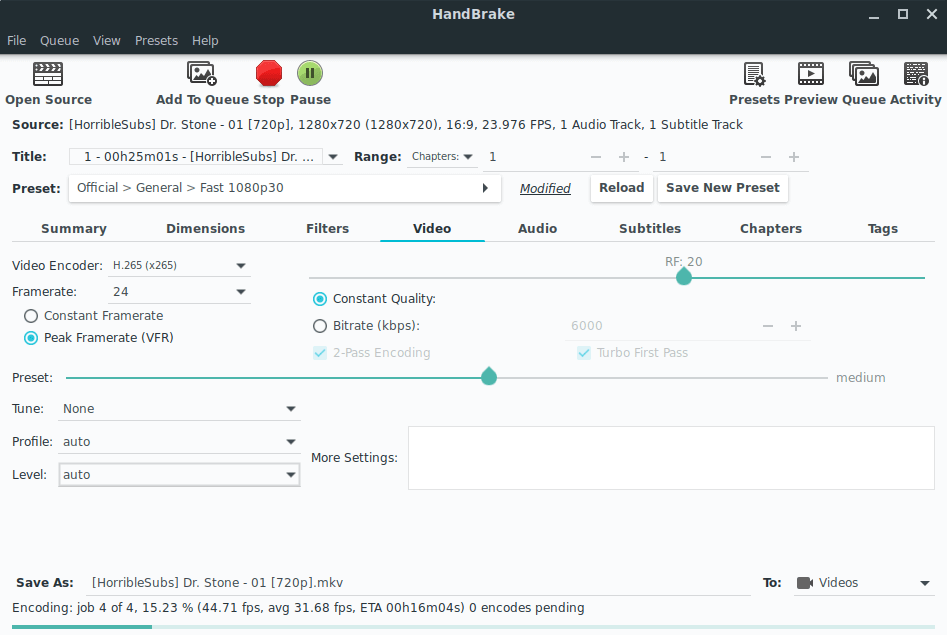 HandBrake GUI – Video tab
HandBrake GUI ran for 17 mins 45 secs with the output size of 245 MB (48.6% smaller). Just to see if there is any difference using HandBrake CLI, I ran this:
$ /usr/bin/time --format='took %e seconds' \
    HandBrakeCLI -i "Dr. Stone - 01.mkv" -o "hb_hevc.mkv" \
    -e x265
It took 15 mins 20 secs with the output size of 192 MB (59% smaller). HandBrake CLI was 2 mins faster and about 10% more efficient. This is interesting. More importantly, FFmpeg is much much more efficient than HandBrake. Why is that?
HEVC with Nvidia NVENC
To know exactly how long it took to transcode from H.264 into H.265 hevc with nvenc via the FFmpeg interface, I used /usr/bin/time instead of shell built-in time to record the duration of the encoding process to get a cleaner data.
# command:
$ /usr/bin/time --format='took %e seconds' \
    ffmpeg -i "Dr. Stone 01.mkv" \
    -c:v hevc_nvenc output.mp4

# terminal output:
took 94.02 seconds
For this process without any optimization, the process ran for 94 seconds and produced an encoded file with the size of 389 MB (18.4% smaller). Theoretically, from H.264 to H.265, one would expect the file size to be cut in half. I am not seeing a half of reduction here. In fact, it is 32% away from being 50%. Thus, the early conclusion here is the GPU transcoding through the nvenc library is not as efficient as the CPU encoding.
Note:
At first with distro-provided FFmpeg v3, I was able to use hevc_nvenc to perform the encoding, but after I installed the snap’s version (with --edge flag) to get the latest FFmpeg v4, I was not able to perform encoding anymore.
At first, the error was that it could not find the libcuda.so.1, which was remedied by installation nvidia-cuda-toolkit from official repo. Then, came another error message saying that “Driver does not support the required nvenc API version. Required: 9.1, found 9.0”. I believe the next step would be installing the latest version of the CUDA toolkit or compiling the latest nvenc and then compile FFmpeg, but ain’t nobody got time for that.
Or, maybe I will think about it and write a script to automate the installation. That is something to think about in the future probably. Maybe after I bought a Turing graphic card (e.g. GTX 1650, now I am on GTX 1050 Ti)
Is this statement still holds true if we use a different interface, e.g. handbrake? First, I queried the available video encoders with this command:
# terminal input
$ HandBrakeCLI --help | grep -A12 "Select video encoder"

# terminal output:
[10:27:44] Nvenc version 9.0

[10:27:44] hb_init: starting libhb thread
[10:27:44] thread 7fe2192e8700 started ("libhb")
   -e, --encoder <string>  Select video encoder:
                               x264
                               x264_10bit
                               nvenc_h264
                               x265
                               x265_10bit
                               x265_12bit
                               nvenc_h265
                               mpeg4
                               mpeg2
                               VP8
                               VP9
                               theora
Okay, seems like everything is fine here. Running the transcoding now.
# terminal input
$ /usr/bin/time --format='took %e seconds' \
    HandBrakeCLI -i "Dr. Stone - 01.mkv" -o "hb_nvenc.mkv" \
    -e nvenc_h265

# terminal output
Encode done!

HandBrake has exited.
took 99.15 seconds
The output size was 327 MB (31.4% smaller) and it took 1 min 39 secs to finish encoding. Slightly slower than FFmpeg hevc_nvenc but with noticeably smaller file size (13% difference). Similar to the GUI version, the subtitle stream did not get copied into the output.
CPU H.265 Encoding with 10-Bit & 12-Bit Depth
# using ffmpeg
/usr/bin/time --format='took %e seconds' \
    ffmpeg -i "Dr. Stone - 01.mkv" \
    -c:v hevc -pix_fmt yuv420p10le \
    output-10e-nvenc.mkv
Use yuv420p10le for 10-bit depth, yuv420p12le for 12-bit.
Using HEVC at 12-bit depth through the HandBrake GUI, the encoding finished at 22 mins 10 secs with the output size of 217 MB (54.5% smaller). FFmpeg HEVC 10-bit finished at 20 mins 13 secs with the output size of 95.7 MB (79.9% smaller). As for FFmpeg HEVC 12-bit, it took 21 mins 21 secs with the output size of 93 MB (80.5% smaller).
While it took almost 2x longer, the benefit was very marginal with CPU-transcoded HEVC 10-bit compared to the default HEVC 8-bit.
Note:
As mentioned above, I first experimented nvenc with FFmpeg v3 that comes with 18.04 LTS. FFmpeg v4 through snap was not able to talk to the nvenc, hence I was not able to experiment with the 10-bit and 12-bit hevc_nvenc.
As for the 12-bit encoding with HandBrake, I first did it with HandBrake GUI and got lazy to do with its CLI. Let’s call it a day for now.
In graphical representation, here is the result. I did not do statistics (that would require more test). Also, I like Python for dataviz.
# import libraries
import matplotlib.pyplot as plt
import seaborn as sns

# total number of frames in this video
TOTAL_FRAMES = 34671

# the data as bunch of lists; FF = FFmpeg, HB = HandBrake
encoder = ['FF (hevc)', 'FF (hevc 10bit)', 'FF (hevc 12bit)',
           'FF (hevc_nvenc)', 'HB cli (hevc)', 'HB cli (hevc_nvenc)',
           'HB gui (hevc)', 'HB gui (hevc 12bit)']
time_second = [774, 1213, 1281, 94, 920, 99, 1065, 1330]
percent_reduction = [78.6, 79.9, 80.5, 18.4, 59, 31.4, 48.6, 54.5,]
output_size = [102, 95.7, 93, 389, 192, 327, 245, 217]

# calculate FPS encoding efficiency (assume average)
fps = [ TOTAL_FRAMES / x for x in time_second ]

# calculate efficiency in seconds per mb reduced
mb_reduced = [ 477 - x for x in output_size ]
efficiency = [ x / y for x, y in zip(time_second, mb_reduced) ]

# chart!
fig, (ax1, ax2, ax3) = plt.subplots(1, 3, sharey = True)
sns.barplot(ax = ax1, y = encoder, x = fps)
sns.barplot(ax = ax2, y = encoder, x = efficiency)
sns.barplot(ax = ax3, y = encoder, x = output_size)
ax1.title.set_text("FPS \n higher = better")
ax2.title.set_text("secs/MB reduced \n lower = better")
ax3.title.set_text("Output MB \n lower = better")

# save the chart
fig.savefig('efficiency.png', format = 'png', dpi = 300, bbox_inches = 'tight')
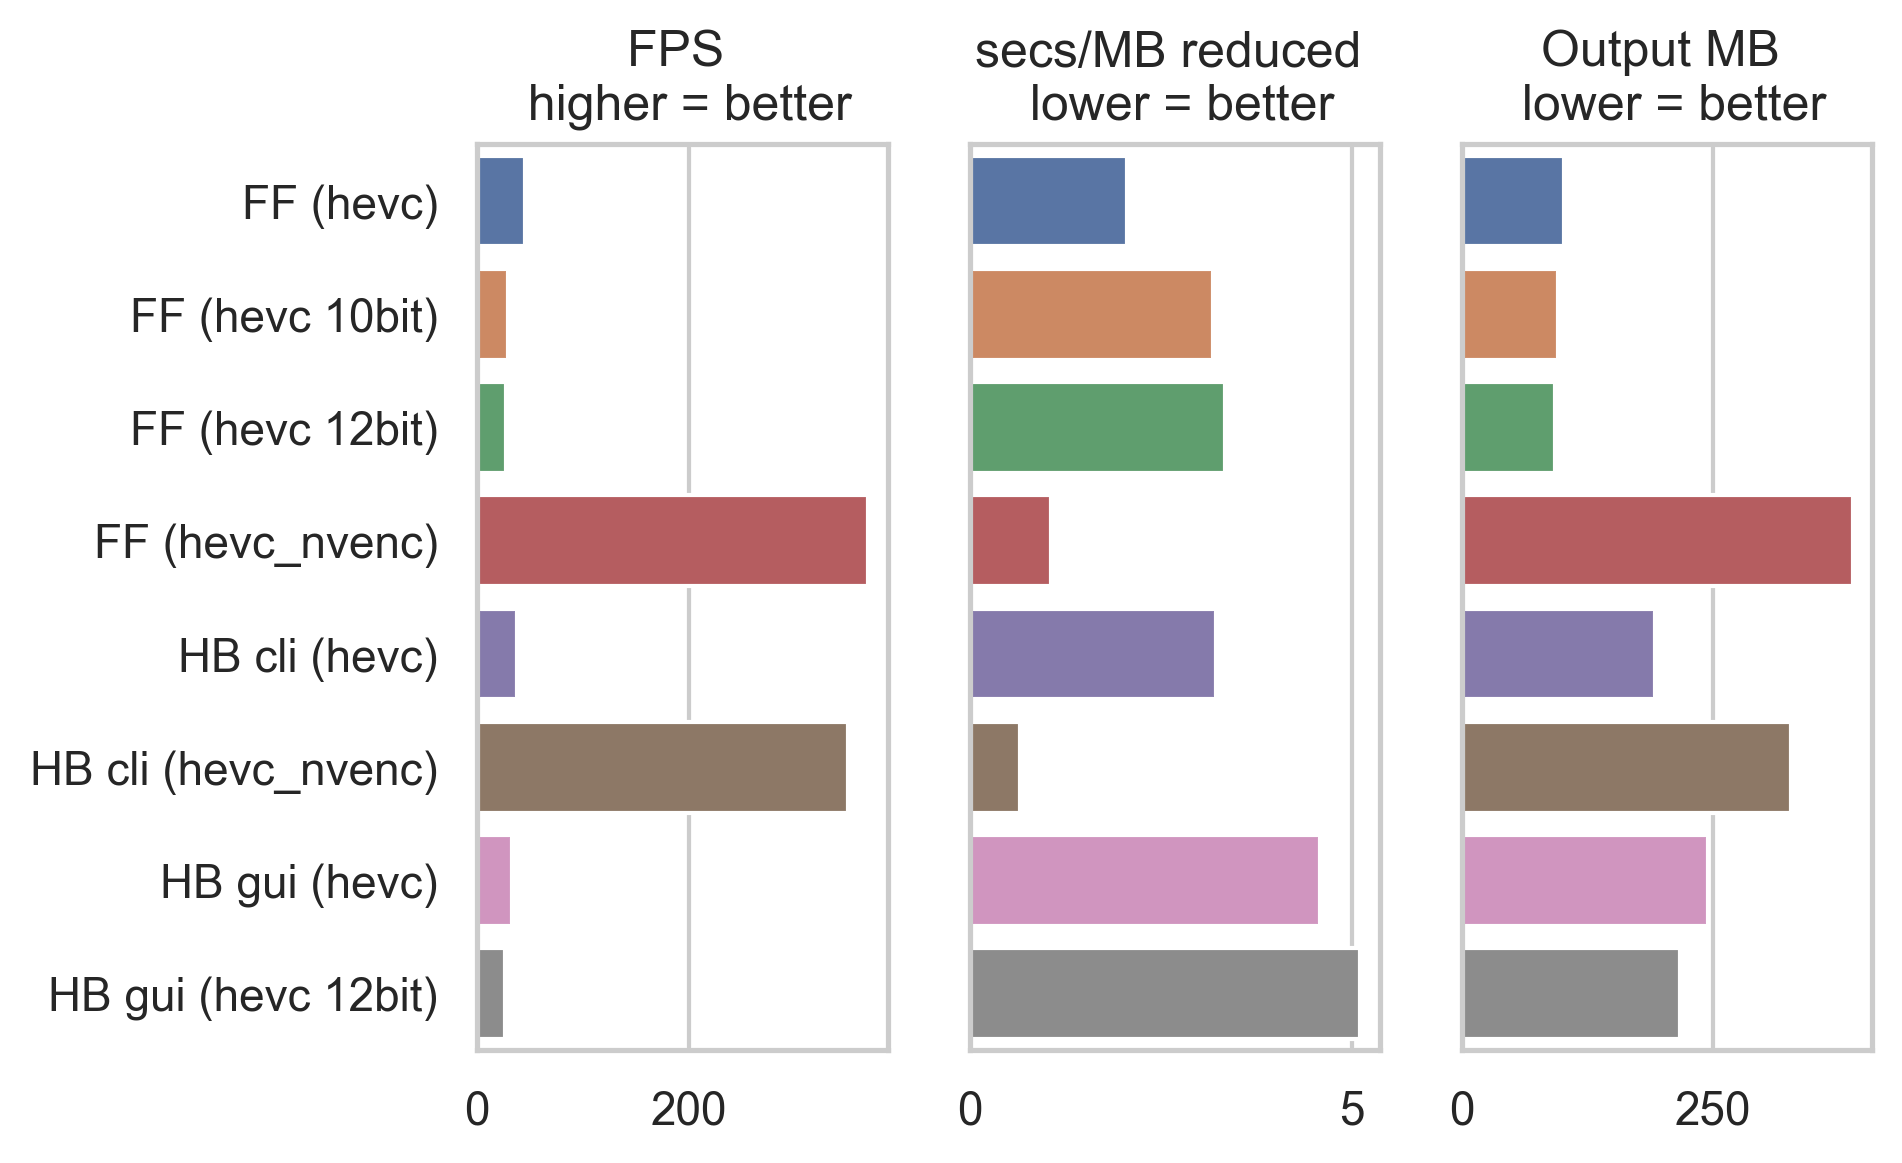 FF = FFmpeg, HB = HandBrake
While it is definitely faster to perform transcoding with nvenc library as shown here by the frame per second (FPS, i.e. amount of frames transcoded per second) and the fact that it is efficient too, however the output file size is somewhat less ideal. However, no doubt that there is a room for improvement and I am excited to see what future holds for us in the GPU-transcoding department. This is especially beneficial for streamers.
The BASH Script for Bulk Transcoding
The whole point of this write-up was for me to send my friend in Malaysia the Dr. STONE anime series because he was having problem with VPN to access Crunchyroll and the fact that the Crunchyroll anime library in Malaysia is… in a very sad state. I highly discourage any activity pertaining to pirating and distributing content without permission.
That being said, I am using this BASH script to perform bulk conversion.
#!/bin/bash

for i in source/*; do
  name=$(basename "$i" .mkv)
  printf "Transcoding ${name} file"
  printf "\n"
  pv "$i" | \
    /usr/bin/time --format="${name} finished in %e seconds" -a -o output.time.txt \
      ffmpeg -i pipe:0 -v warning \
        -c:v hevc \
        "./transcoded/${name} - transcoded.mkv"
  printf "Done transcoding $i"
  printf "\n"
  printf "\n"
done
Hardcoded in this script is the location for the source folder and the transcoded folder, which is relative to the script’s root. Absence of these two folders would exit the script with a non-zero exit status. It would be ideal to write an extra block for checking and creating these two folders prior to ffmpeg execution, but this would suffice for now.
By using pv to pipe, the placeholder for any subsequent command to consume the stream is pipe:0. By default, ffmpeg outputs a lot of stuff to the terminal stdout. By piping the file through pipeview pv, it shows a progress bar. The argument -v warning suppresses ffmpeg terminal output, keeping the view cleaner. However, not all files can be pv‘ed. In this case, I am fortunate because .mkv is considered as streamable, thus can be pv‘ed just fine.
 Running bulk transcoding with a BASH script
Now the next question being, how was the overall transcoding efficiency?
# setting things up
import pandas as pd

# ordering logically, Source on the right, Output on the left
order_list = ["Source", "Output"]

# the list
episode = ['#1', '#2', '#3', '#4', '#5', '#6', '#7', '#8', '#9', '#10', '#11', '#12']
source_size = [477, 489, 504, 443, 524, 507, 747, 746, 746, 746, 746, 747]
output_size = [95, 114, 111, 99, 120, 103, 103, 105, 87, 92, 106, 101]
reduction = [ x-y for x, y in zip(source_size, output_size) ]

# create dataframe with pandas
zippedList = list(zip(episode, source_size, output_size))
df = pd.DataFrame(zippedList, columns = ['Episode', 'Source', 'Output'])

# melt from wide to long
df_melt = df.melt(id_vars = ['Episode'], value_vars = ['Source', 'Output'],
                  value_name = 'Size', var_name = 'Type')

# sort the Type so Seaborn displays Source first with pd.Categorical()
df_melt["Type"] = pd.Categorical(df_melt["Type"],
                  categories = order_list, ordered = True)

# chart!
fig, (ax1, ax2) = plt.subplots(2, 1, figsize = (3,5))
fig.tight_layout()
sns.lineplot(ax = ax1, data = df_melt, y = 'Size', x = 'Type',
             hue = 'Episode', marker = "o")
sns.barplot(ax = ax2, y = episode, x = reduction)
ax1.get_legend().remove()
ax1.xaxis.set_label_text("")
ax1.title.set_text("Source & Output Size")
ax2.title.set_text("Reduction of Size in MB")

# save chart!
fig.savefig('result.png', format = 'png', dpi = 300, bbox_inches = 'tight')
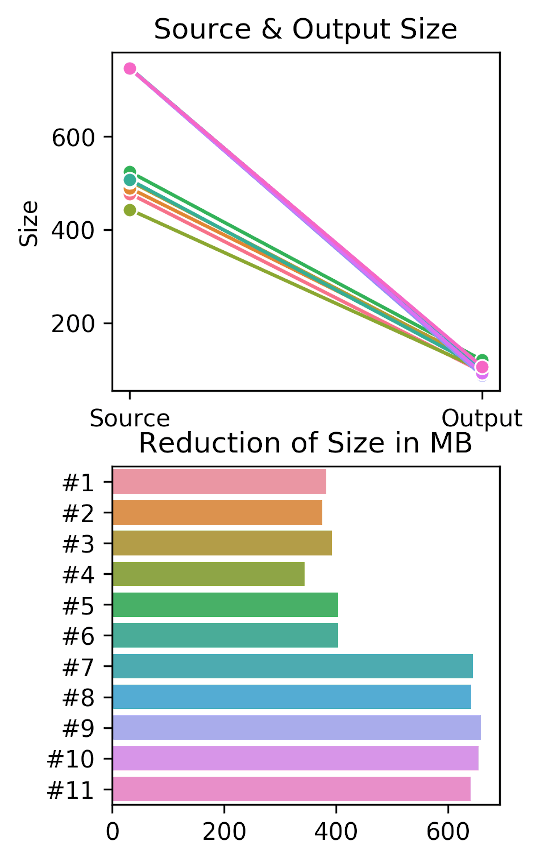
It is quite interesting that from this trend, we could infer the people behind HorribleSubs probably wanted to release the episodes for Dr. Stone as fast as possible by cutting down the transcoding time, which led to increase in file size starting from episode #7. Cannot really blame them because the show became really popular.
Transcoding Time & Percent Reduction
Almost halfway through transcoding Dr. Stone, it struck me that I did not measure the correlation between duration of transcoding process and the percent reduction. Repeating the transcoding for the same process would be less ideal so I decided to gather data from another hugely popular anime series: Kimetsu no Yaiba (Demon Slayer).
For this experiment I used the /usr/bin/time program, which means the bash script now looks different than before.
#!/bin/bash

for i in source/*; do
  name=$(basename "$i" .mkv)
  printf "Transcoding ${name} file"
  printf "\n"
  pv "$i" | \
    /usr/bin/time --format="${name} finished in %e seconds" -a -o output.time.txt \
      ffmpeg -i pipe:0 -v warning \
        -c:v hevc \
        "./transcoded/${name} - transcoded.mkv"
  printf "Done transcoding $i"
  printf "\n"
done
/usr/bin/time can output to a file, here called output.time.txt, with the -o switch and the -a switch tells it to append the file (instead of overwriting). In an ideal world, a block of Python code can be used to parse the output, but I got lazy to come up with one (I am still a novice at coding!) so I will just transcribe the result into a Python list, and then work from there.
When referencing to a variable within a string, use double " " quote sign instead of single ’ ’ quote sign. Also, remember the difference between
${} and $(), because these two are completely different.
I initially wrote the script in macOS. The first roadblock was the /usr/bin/time on macOS is not the same as the one on linux. Then, I installed gnu-time through brew, which then can be called by issuing gtime, located at /usr/local/bin/gtime.
# import some more libraries
from scipy import stats
import numpy as np

# data points
episode = ['#1', '#2', '#3', '#4', '#5', '#6', '#7', '#8', '#9', '#10', '#11', '#12',
           '#13', '#14', '#15', '#16', '#17', '#18', '#19', '#20', '#21', '#22', '#23',
           '#24', '#25', '#26']
source_size = [509, 387, 439, 383, 391, 368, 414, 391, 502, 465, 405, 400,
               495, 432, 392, 430, 437, 429, 388, 730, 732, 731, 732, 732, 732, 747]
output_size = [115, 82, 95, 87, 78, 78, 93, 94, 109, 98, 100, 93,
               112, 99, 95, 105, 104, 100, 98, 94, 82, 78, 76, 89, 102, 89]
time_taken = [1085, 982, 1031, 933, 891, 911, 983, 944, 1082, 989, 942, 957,
              1121, 1030, 1019, 1100, 1042, 1054, 1115, 1022, 930, 854, 863, 898, 942, 954]
pct_reduction = [ ((x-y)/x)*100 for x,y in zip(source_size, output_size) ]

# make a table for inspection
df = pd.DataFrame(list(zip(episode, source_size, output_size, pct_reduction, time_taken)),
     columns = ["Episode", "Source", "Output", "Percent Reduction", "Time Taken"])

# plot correlation chart
fig, ax = plt.subplots()
sns.regplot(ax = ax, x = pct_reduction, y = time_taken)

# Pearson correlation stat, store into corr variable
corr = stats.pearsonr(pct_reduction, time_taken)

# add correlation function to the chart
ax.text(84.7, 1105, "r of " + str(np.around(corr[0], decimals = 3)))
ax.text(84, 1080, "p-val of " + str(np.around(corr[1], decimals = 3)))
ax.set_ylabel("Time Taken (secs)")
ax.set_xlabel("Reduction in Percent")

# annotate data point
for x, y, episode in zip(pct_reduction, time_taken, episode):
    ax.text(x+0.1, y-15, episode, color = 'gray', fontsize = 5, alpha = 0.75)

# save the chart
fig.savefig('corr.png', format = 'png', dpi = 300, bbox_inches = 'tight')
Did I tell you I enjoy using list comprehension in Python? It is something of an absolute beauty. My only regret is the fact that I did not learn Python sooner, like maybe when I was five?
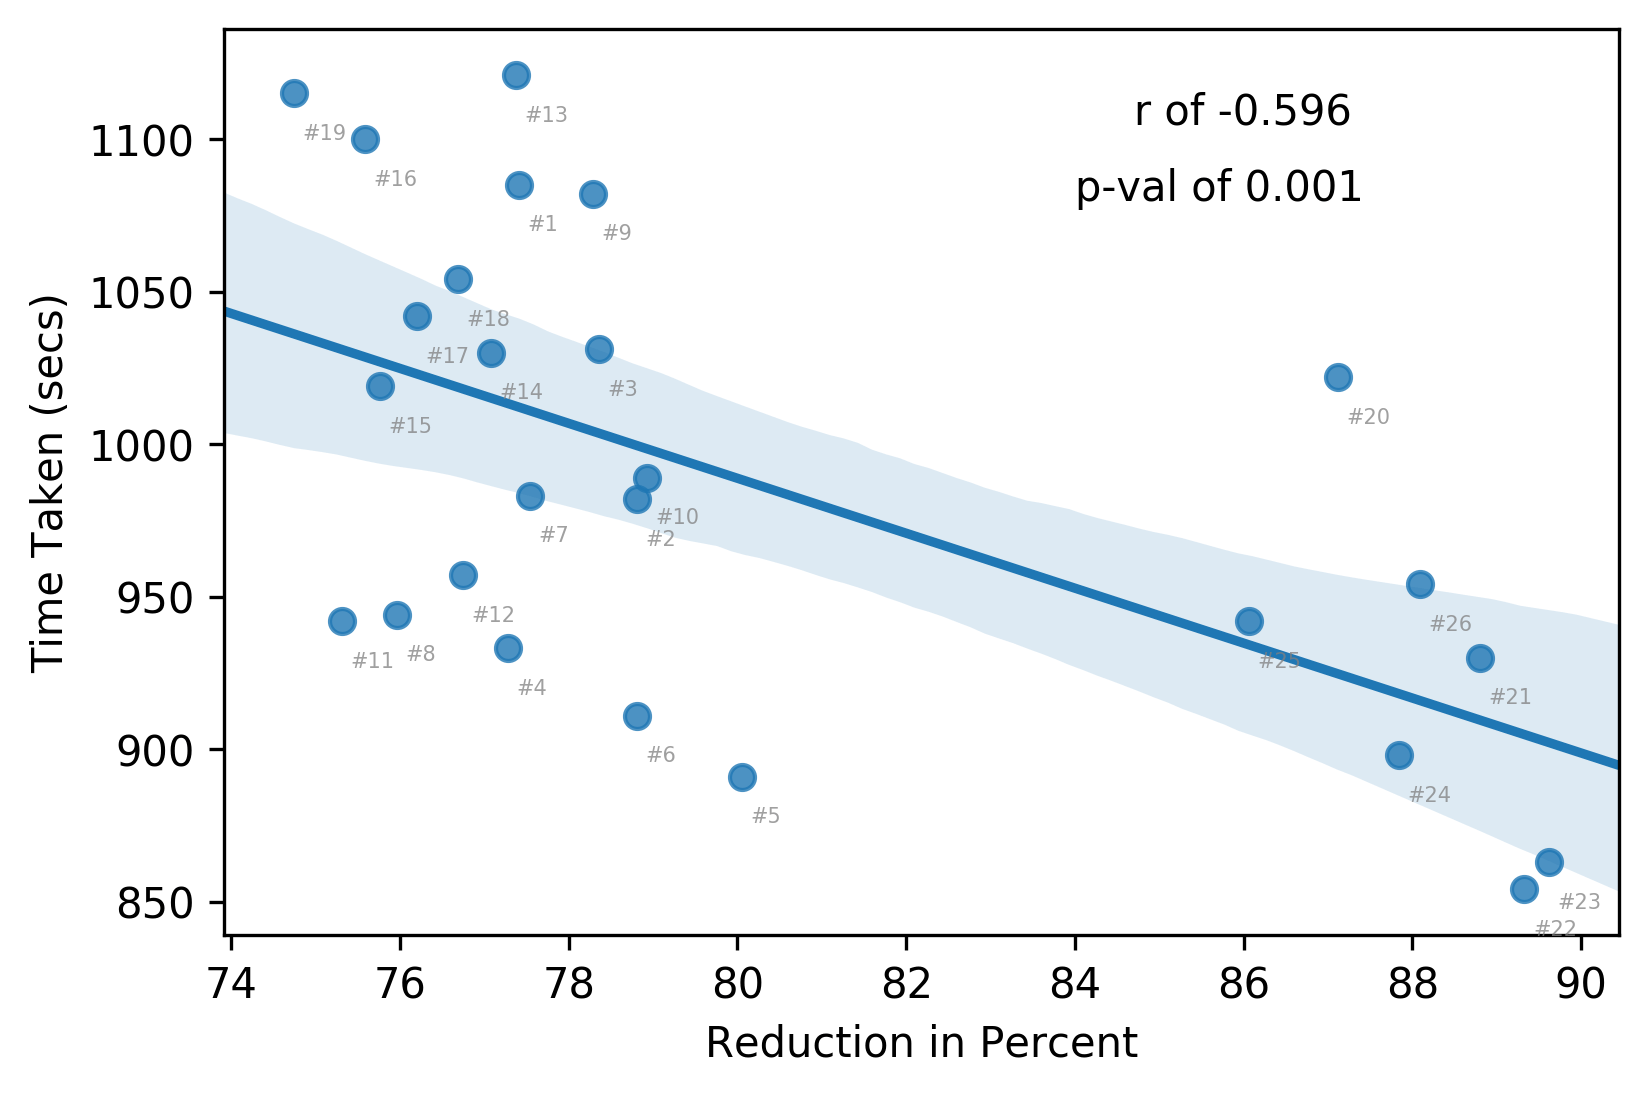 ….wat… the r & p-value do not look too bad
Looks to me the encoders, towards the end of the series (eps 20 - 26) did not care enough anymore to produce smaller size encoders (sub-500 MB) and released > 700 MB files. I guess they were having tons of things to encode in fall anime season?
scipy is not the only library that provides correlation function. pandas offers it through .corr() method, numpy through np.corrcoef(). Of note, Pearson correlation assumes both data are continuous and normally distributed. On the other hand, Spearman does not make that assumption.
Closing
From a frustration of not being able to find small-size anime with decent resolution of 720p, I turned that frustration into a quick experiment that consumed hours of trying different things. This whole thing has been a fun process.
This whole experiment has been a fun trip. I learned that shell builtin time and /usr/bin/time are two different things. I also learned that BSD and GNU /usr/bin/time are different. Then I learned a couple more things about FFmpeg; the one in 18.04 Bionic’s repo is outdated (v3), and while brew can pull and compile a v4, it does not get compiled with nvenc library, which the snap’s version does. I did not attempt at fixing the unmet nvenc version as that would be a different trip (or maybe let me get a Turing card first).
For future directions, maybe I will go back to compiling ffmpeg binary from scratch. Maybe that way I could circumvent the issue with unmet dependencies. When I was on my Macbook Pro couple years ago, I did successfully compile ffmpeg from source codes. It was not a lot of work, but things have changed now, which would necessitate me to studying the details again.